bomonike
 This is at https://bomonike.github.io/microbit
This is part of a series about low-cost, low-power SOC (System on a Chip) microcontrollers (MCUs):
https://microbit.org/code/
https://www.parallax.com
https://www.parallax.com/product-category/sensors/
The proper orientation is the 25-pixel LEDs with gold connectors at the bottom.
QUESTION: have a stand?
Python
-
In a browser:
https://python.microbit.org/v/3
- Click the purple “Send to micro:bit” at the lower-left corner.
- Click Next to the micro:bit board illustration for plugging in the cable.
- Click Next to the instruction.
- Click “BBC micro:bit CMSIS-DAP”, then Next.
1st Python run to Serial monitor
From https://learn.parallax.com/tutorials/robot/cyberbot/get-started-microbit-and-python/use-serial-monitor
from microbit import *
import os, sys, machine
# https://microbit-micropython.readthedocs.io/en/v2-docs/os.html
print("os.uname():",os.uname())
print("")
print("sys.platform:",sys.platform)
print("sys.version_info:",sys.version_info)
print("sys.version:",sys.version)
print("sys.modules:",sys.modules)
print("sys.implementation:",sys.implementation)
print("")
print("machine.unique_id():",machine.unique_id())
print("machine.freq():",machine.freq())
- If “Show serial” does not appear at lower-right, click “Simulator”
-
Click the three vertical dots to the right of “High serial” text for this:
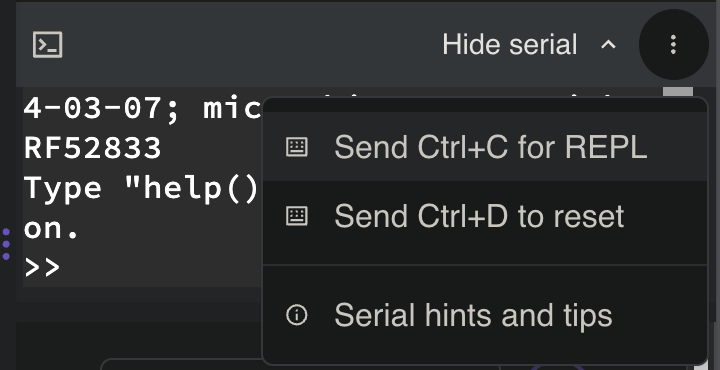
That’s a reminder to hold down the Ctrl key and D together to reset.
PROTIP: The micro:dot terminal does not understand the “clear” command.
-
The back of the micro:bit board has a reset button.
- Click “Show serial” at the lower-right so it turns to “Hide serial”.
- Click on the Serial monitor body (to switch the cursor from a square to a solid white rectangle).
- Click the right side of the purple “Send to micro:bit” icon (with three vertical dots) and select “Disconnect”. The response from the code above:
os.uname(): (sysname='microbit', nodename='microbit', release='2.1.2', version='micro:bit v2.1.2+0697c6d on 2023-10-30; MicroPython v1.18 on 2023-10-30', machine='micro:bit with nRF52833')

sys.platform: microbit, os
sys.version_info: (3, 4, 0)
sys.version: 3.4.0
sys.modules: {}
sys.implementation: (name='micropython', version=(1, 18, 0))

machine.unique_id(): b'j\x11\xe7S*\xcf\xc3\xee'
machine.freq(): 64000000
The following appears on every execution:
MicroPython v1.18 on 2023-10-30; micro:bit v2.1.2 with nRF52833
Type "help()" for more information.
>>>
NOTE: There is a uname command in every operating system.
- Click “Hide serial”.
Emulator
display.scroll('Hello')
- Click “Emulator” at the right-top.
LEDs
Make it flash a heart and the letters to “HeLLo” every minute:
from microbit import *
# Code in a 'while True:' loop repeats forever
while True:
    display.show(Image.HEART)
    sleep(1000)
    display.scroll('Hello')
microbit library
https://microbit-micropython.readthedocs.io/en/v2-docs/microbit_micropython_api.html
# sleep for the given number of milliseconds.
sleep(ms)
# returns the number of milliseconds since the micro:bit was last switched on.
running_time()
# returns the temperature in Celcius
temperature()
# converts a number from one scale of values to another
scale(value_to_convert, from_=(min_value, max_value), to=(min_value, max_value))
# makes the micro:bit enter panic mode (this usually happens when the DAL runs
# out of memory, and causes a sad face to be drawn on the display). The error
# code can be any arbitrary integer value.
panic(error_code)
# resets the micro:bit.
reset()
# sets the output volume (0-255) of the micro:bit speaker **V2** and
# external speaker or headphones connected to the edge connector pins.
set_volume(128)    # V2
Accelerometer
To play Yathzee?
from microbit import *
import random
while True:
    if accelerometer.was_gesture('shake') or button_a.was_pressed() or button_b.was_pressed():
        display.show(random.randint(1, 6))
randint(1,6) means return a number from 1 to 6.
Shake the micro:bit.
From https://python.microbit.org/v/3/ideas/dice
Buttons
Press A if correct, B if wrong
Thermometer
Press (left) Button A to show temperature in Celsius:
from microbit import *
display.show(Image.HEART)
while True:
    if button_a.was_pressed():
        # Function temperature() obtains the temp in Centigrade
        display.scroll(temperature())
    if button_b.was_pressed():
        # Convert temperature() obtains the temp in Centigrade
        celsius=temperature()
        fahrenheit = (celsius * 1.8) + 32
        # Truncate/pad a flot to no decimal without rounding:
        display.scroll(str(fahrenheit))  # for 75.2
NOTE: The default is Centigrade/Celsius because micro:bit was created for the BBC in the UK.
Microphone
The microphone senses sound from a small hole on the front of the micro:bit.
from microbit import *
lightsOn = False
while True:
    if microphone.was_event(SoundEvent.LOUD):
        lightsOn = not lightsOn
        if lightsOn:
            display.show(Image.HEART)
        else:
            display.clear()
    sleep(100)
Clap your hands.
From https://python.microbit.org/v/3/ideas/clap-lights
Sound insulation mixer
From https://microbit.org/projects/make-it-code-it/sound-insulation-meter/ two micro:bits are used: one a microphone and another a sound source of consistent volume and distance.
Speaker
from microbit import *
import music
speaker.on()
set_volume(255)  # from range 0 to 255 for loudest:
# By default notes are played in the 4th octave:
for x in range(2):
    music.play(['C4:4', 'D4', 'E4', 'C4'])
for x in range(2):
    music.play(['E4:4', 'F4', 'G4:8'])

if accelerometer.was_gesture('shake'):
    music.play(['c', 'd', 'e', 'c'])
if button_a.was_pressed():
    music.play(['c', 'd', 'e', 'c'])
if button_b.was_pressed():
    # Play in 3rd Octave:
    music.play(['c3', 'd3', 'e3', 'c3'])
The song should play as soon as the program is sent.
Use musical notation: https://python.microbit.org/v/3/reference/play-notes
From https://python.microbit.org/v/3/ideas/fr%C3%A8re-jacques
Speak!
from microbit import *
import speech
# Defaults per https://microbit-micropython.readthedocs.io/en/v2-docs/speech.html:
# STATUS: This is unintelligible:
words="hello"
speech.say(words, pitch=64, speed=72, mouth=128, throat=128, pin=pin0)
speech.pronounce("WAY2 SHUH7D AY WAO5K TUX DHAH STOH5R.")
from https://python.microbit.org/v/3/api/speech.pronounce
PROTIP: An external speaker is really needed!
Sound with for and sleep
Know what these sounds mean:
from microbit import *
import random
import music
from microbit import sleep
# speaker.on()
set_volume(255)  # from range 0 to 255 for loudest:
# 10 Built-in sounds https://pc-microbit-micropython.readthedocs.io/en/latest/sound/audio_sounds.html
def play(call):
    if call == 1:
        audio.play(Sound.HELLO)
        display.scroll('HELLO')
    if call == 2:
        audio.play(Sound.GIGGLE)
        display.scroll('GIGGLE')
    if call == 3:
        audio.play(Sound.HAPPY)
        display.scroll('HAPPY')
    if call == 4:
        audio.play(Sound.MYSTERIOUS)
        display.scroll('MYSTERIOUS')
    if call == 5:
        audio.play(Sound.SAD)
        display.scroll('SAD')
    if call == 6:
        audio.play(Sound.SLIDE)
        display.scroll('SLIDE')
    if call == 7:
        audio.play(Sound.SOARING)
        display.scroll('SOARING')
    if call == 8:
        audio.play(Sound.SPRING)
        display.scroll('SPRING')
    if call == 9:
        audio.play(Sound.TWINKLE)
        display.scroll('TWINKLE')
    if call == 10:
        audio.play(Sound.YAWN)
        display.scroll('YAWN')
    sleep(1)  # 1000 = 1 second
# MAIN:
for call in range(10):
    display.show(call)
    play(call)
Compass
To ensure the compass gives accurate readings, “TILT TO FILL SCREEN” scrolls across the display the first time you use the compass or command compass.calibrate() Stand the micro:bit on each edge until every LED light is lit for a happy face.
from microbit import *
while True:
    if button_a.was_pressed():
        display.scroll(compass.heading())
    if button_b.was_pressed():
        magnet_strength_x = compass.get_x()
        display.scroll(magnet_strength_x)
From https://python.microbit.org/v/3/reference/heading
Radio antenna
When you have two micro:bit boards:
https://learn.parallax.com/tutorials/robot/cyberbot/cybersecurity-radio-basics
Radio to Transmit Weather
From https://learn.sparkfun.com/tutorials/wireless-remote-weather-station-with-microbit/all
Use MakeCode’s radio blocks to have one micro:bit transmit a signal to a receiving micro:bit on the same channel. This is useful if your weather station is installed in a location that is difficult to retrieve data from the OpenLog.
There are a few different ways to send and receive data. Send MQTT protocol to a Raspberry Pi, which communicates with a Google Nest.
Alligator clips
https://makecode.microbit.org/reference/radio
https://forum.core-electronics.com.au/t/weather-bit-micropython-code-examples-needed/2212
https://microbit.org/projects/make-it-code-it/environment-data-logger/
https://www.hackster.io/idreams/lora-weather-station-with-bbc-micro-bit-3f14f8
Cyber:bot robot
Build the Robot car in the kit based on https://learn.parallax.com/tutorials/robot/cyberbot/build-your-cyberbot-rev-c-board $279 from https://www.parallax.com/product/cyberbot-robot-kit-with-microbit/
- Right-link URL below to “Save link” https://learn.parallax.com/tutorials/robot/cyberbot/add-modules-your-microbit
- Create new folder “microbit”
-
Click “Save” to download file “cyberbot-template-with-blink.hex” binary from:
https://www.parallax.com/package/cyberbot-library-python/
https://learn.parallax.com/support/reference/cyberbot-library-reference
-
Unzip the file.
-
In either Google Chrome or Microsoft Edge, go to the micro:bit Python Editor at
- Ignore the code already there.
- Click “Project” at the left edge.
- Click “Open”.
- Select the file “cyberbot-template-with-blink.hex” and click “Open”.
This enables you to use command:
from cyberbot import * - Make sure that static has been discharged from your body.
-
Lay the pieces down separately on a non-conductive surface (not on top of each other yet).
- Make sure the 5 AA batteries you have are all fully charged.
- In the battery pack, put in 5 AA batteries, each in a correct orientation.
- Put the black battery pack with cable coming out the middle of the aluminum frame.
-
Attach the cyber:bot board to the aluminum frame holding the batteries.
-
Plug the 5AA battery pack wire into the cyber:bot board.
Two green LEDs should shine on the board.
- Plug the micro:bit with the LEDs face up onto the cyber:bot board.
-
Connect the micro:bit board to the cyber:bot board.
- On the edge of the cyber:bot, set the PWR switch set to 1 or 2.
- Set PWR to 0, the script won’t run and green lights are off, to conserve battery.
- Set PWR to 1 to power everything while downloading code.
- Set PWR to 2 to powers all features except the servo ports (to keep the robot from running away while downloading code).
- Click the micro:bit Python Editor’s purple “Open” sausage button.
-
Browse to and open cyberbot-template-with-blink.hex.
from cyberbot import * while True: bot(21).write_digital(1) sleep(250) bot(21).write_digital(0) sleep(250) - Click “Send to micro:bit”, then Yes, Yes. Click your board name so “Micro:bit flashed” appears at the lower-left corner.
-
Click the Send to micro:bit button, and follow the Connect to micro:bit popups.
(For robot navigation apps, you’d be disconnecting the USB cable after this step.)
- Verify that the P21 light blinks.
OTA download code
From https://forum.micropython.org/viewtopic.php?t=11746
Microsoft MakeCode supports Bluetooth BLE on the micro:bit.
To control a micro:bit from a laptop, use a second micro:bit connected to the laptop. For both V1 and V2 micro:bits.
On the laptop running Linux with Python installed:
#!/usr/bin/python3

import serial
import time
from serial.tools.list_ports import comports as serial_ports
import sys

def find_microbit():

  ports = serial_ports()

  for port in ports:
    if "VID:PID=0D28:0204" in port.hwid:
      return port.device

  return None

port = find_microbit()

if port:
  print('\nMicro:bit found at port %s.\n' % port)
else:
  print('\nError: No micro:bit found.\n')
  sys.exit(1)

ser = serial.Serial(port=port, baudrate=115200, timeout=1)

while True:
    msg = input("Send message: ")
    if not msg:
        break
    else:
        msg = msg.encode("ascii")
        print(msg)
        ser.write(msg)
On the micro:bit connected to the laptop:
from microbit import *
import radio

radio.config()
radio.on()
uart.init(115200)

while True:
    msg = uart.read()
    if msg:
        msg = str(msg, 'UTF-8')
        display.scroll(msg, delay=80, wait=False)
        radio.send(msg)
On the microbit (with battery) you want to control remotely:
from microbit import *
import radio

radio.config()
radio.on()

while True:
    msg = radio.receive()
    if msg:
        display.scroll(msg, delay=80)
AI
https://learn.parallax.com/tutorials/series/artificial-intelligence-tutorial-series
See https://learn.parallax.com/node/2681
Ag Gardening app
https://www.youtube.com/watch?v=mUOAQRa17T4 MDeLuise/plant-it self-hosted, open source gardening companion