bomonike
Get started safely & quickly using AWS GUI, CLI, and Terraform
![]()
![]()
![]()
![]()
![]()
![]()
![]()
![]()
![]()
![]()
![]()
![]()
![]()
Overview
- Why? Better KPI values for onboarding
- AWS URLs
- Types of AWS accounts
- Ways to create resources in AWS
- AWS Mobile App on smart phones
- Ecosystem Flowchart
- Setup stand-alone root account
- Console navigation & configuration
- Job Roles
- Separation of Duties and Concerns
- Role Groups for Permissions
- Permissions in JSON policy files
- AWS Organizations
- Preparations for highly secure use of AWS
- AWS Profile
- AWS Free Tier Benefits
- Specify Your Default Region settings
- Root account lockdown
- Create Admin sub-account
- Unique restricted email for God-Mode Global Admin Root account
- Auto-Generate Emails with Responders
- Installing, updating AWS CLI
- AWS configure
- Secure Individual Config
- Setup Git-signing
- Roles for federated access
- aws-info.sh
- AWS Services List
- Earn Money: Explore AWS
- Setup AWS Budgets
- HashiCorp Terraform
- Coding to obtain resources from S3
- Claim S3 Bucket names
- Automatic key rotation
- AWS CLI
- IAM CLI
- Linux AMIs
- Advanced User Data
- References
- Manually Rotate Access keys
- Secure AWS Credentials
- More on Amazon
- More on DevOps
- More on Security
- Automation
- GenAI
- MCP
- AWSAmplify
- Lambda Function for $20
- References
This is a logically presented hands-on deep dive on how to setup AWS cloud like a pro. Advice prefixed by “PROTIP” highlight my hard-won advice available nowhere else.
Covered here are instructions on how to install and code CLI scripts and Python programs, and 3rd party tools used by pros.
Why? Better KPI values for onboarding
“PROTIP” Recommendations in this article are intended to improve these Key Performance Indicators (KPIs) of an organization:
What is the max/average hours that:
A. each Administrators to get accounts and a laptop ready for receipt by a new team member?
A1. each Administrator needs to spend between receiving instructions to get an AWS account ready for use by an end-user?
B. each end-user needs to spend from receiving a laptop to being completely productive (create and file a Git PR)?
B1. each end-user needs to spend between receiving instructions to being completely productive on AWS?
PROTIP: CAUTION: Using speed as the primary basis for judging performance can lead to cutting corners and thus security holes. So security must be a primary consideration. But security is difficult to measure.
AWS URLs
-
Internet Browser tricks
PROTIP: Right-click on each link to “open in a new tab”. Then quickly switch back and forth between this tutorial and other browser tabs by pressing Command+` (backtick at the left of the 1 key). However, tabs set to full-screen are not accessible this way but by pressing shift+command+/ to see the menu to select the tab you want to switch to.
PROTIP: So that you can organize the links the way you want (despite when Amazon changes them), create a set a bookmark this page in your browser for quicker frequent access. Share them for those new to AWS.
-
Use an internet browser to get on the AWS marketing page at
https://aws.com resolves to
https://aws.amazon.com -
Explore its menu items:

“My account” consists of:
- AWS Management Console
- Account Settings
- Billing & Cost Management
- Security Credentials
- AWS Personal Health Dashboard (EventBridge rules)
PROTIP: Additionally:
- AWS CLI Command line interface for AWS
-
<a target=”_blank” href=”https://health.aws.amazon.com/health/status - **AWS Service Health Dashboard</a> Real-time service status
- AWS Architecture Center Reference architectures and best practices
-
AWS Well-Architected Best practices for cloud architectures
- AWS Pricing Calculator Estimate costs for AWS services
- AWS Free Tier Free usage tiers for AWS services
- AWS Regional Services List Services available by region
Click “Support” menu:
- Support Center
- Expert Help for Experts on-demand. Post your request and work with pre-vetted talent. Pay securely through AWS. On May 28, 2026, AWS will discontinue support for AWS IQ.
- Documentation
- Knowledge Center
- AWS Support Overview
- AWS re:Post
Resources
- Documentation Get detailed technical guides and references for all AWS services and tools
- Cloud term glossary Learn more about key cloud computing concepts
-
Cloud fundamentals (essentials) Step-by-step instructions for common AWS tasks
- Training & Certification Build and validate your AWS cloud skills and technical expertise
- Whitepapers & Guides
- Tutorials Get started with step-by-step tutorials that help you start building on AWS
-
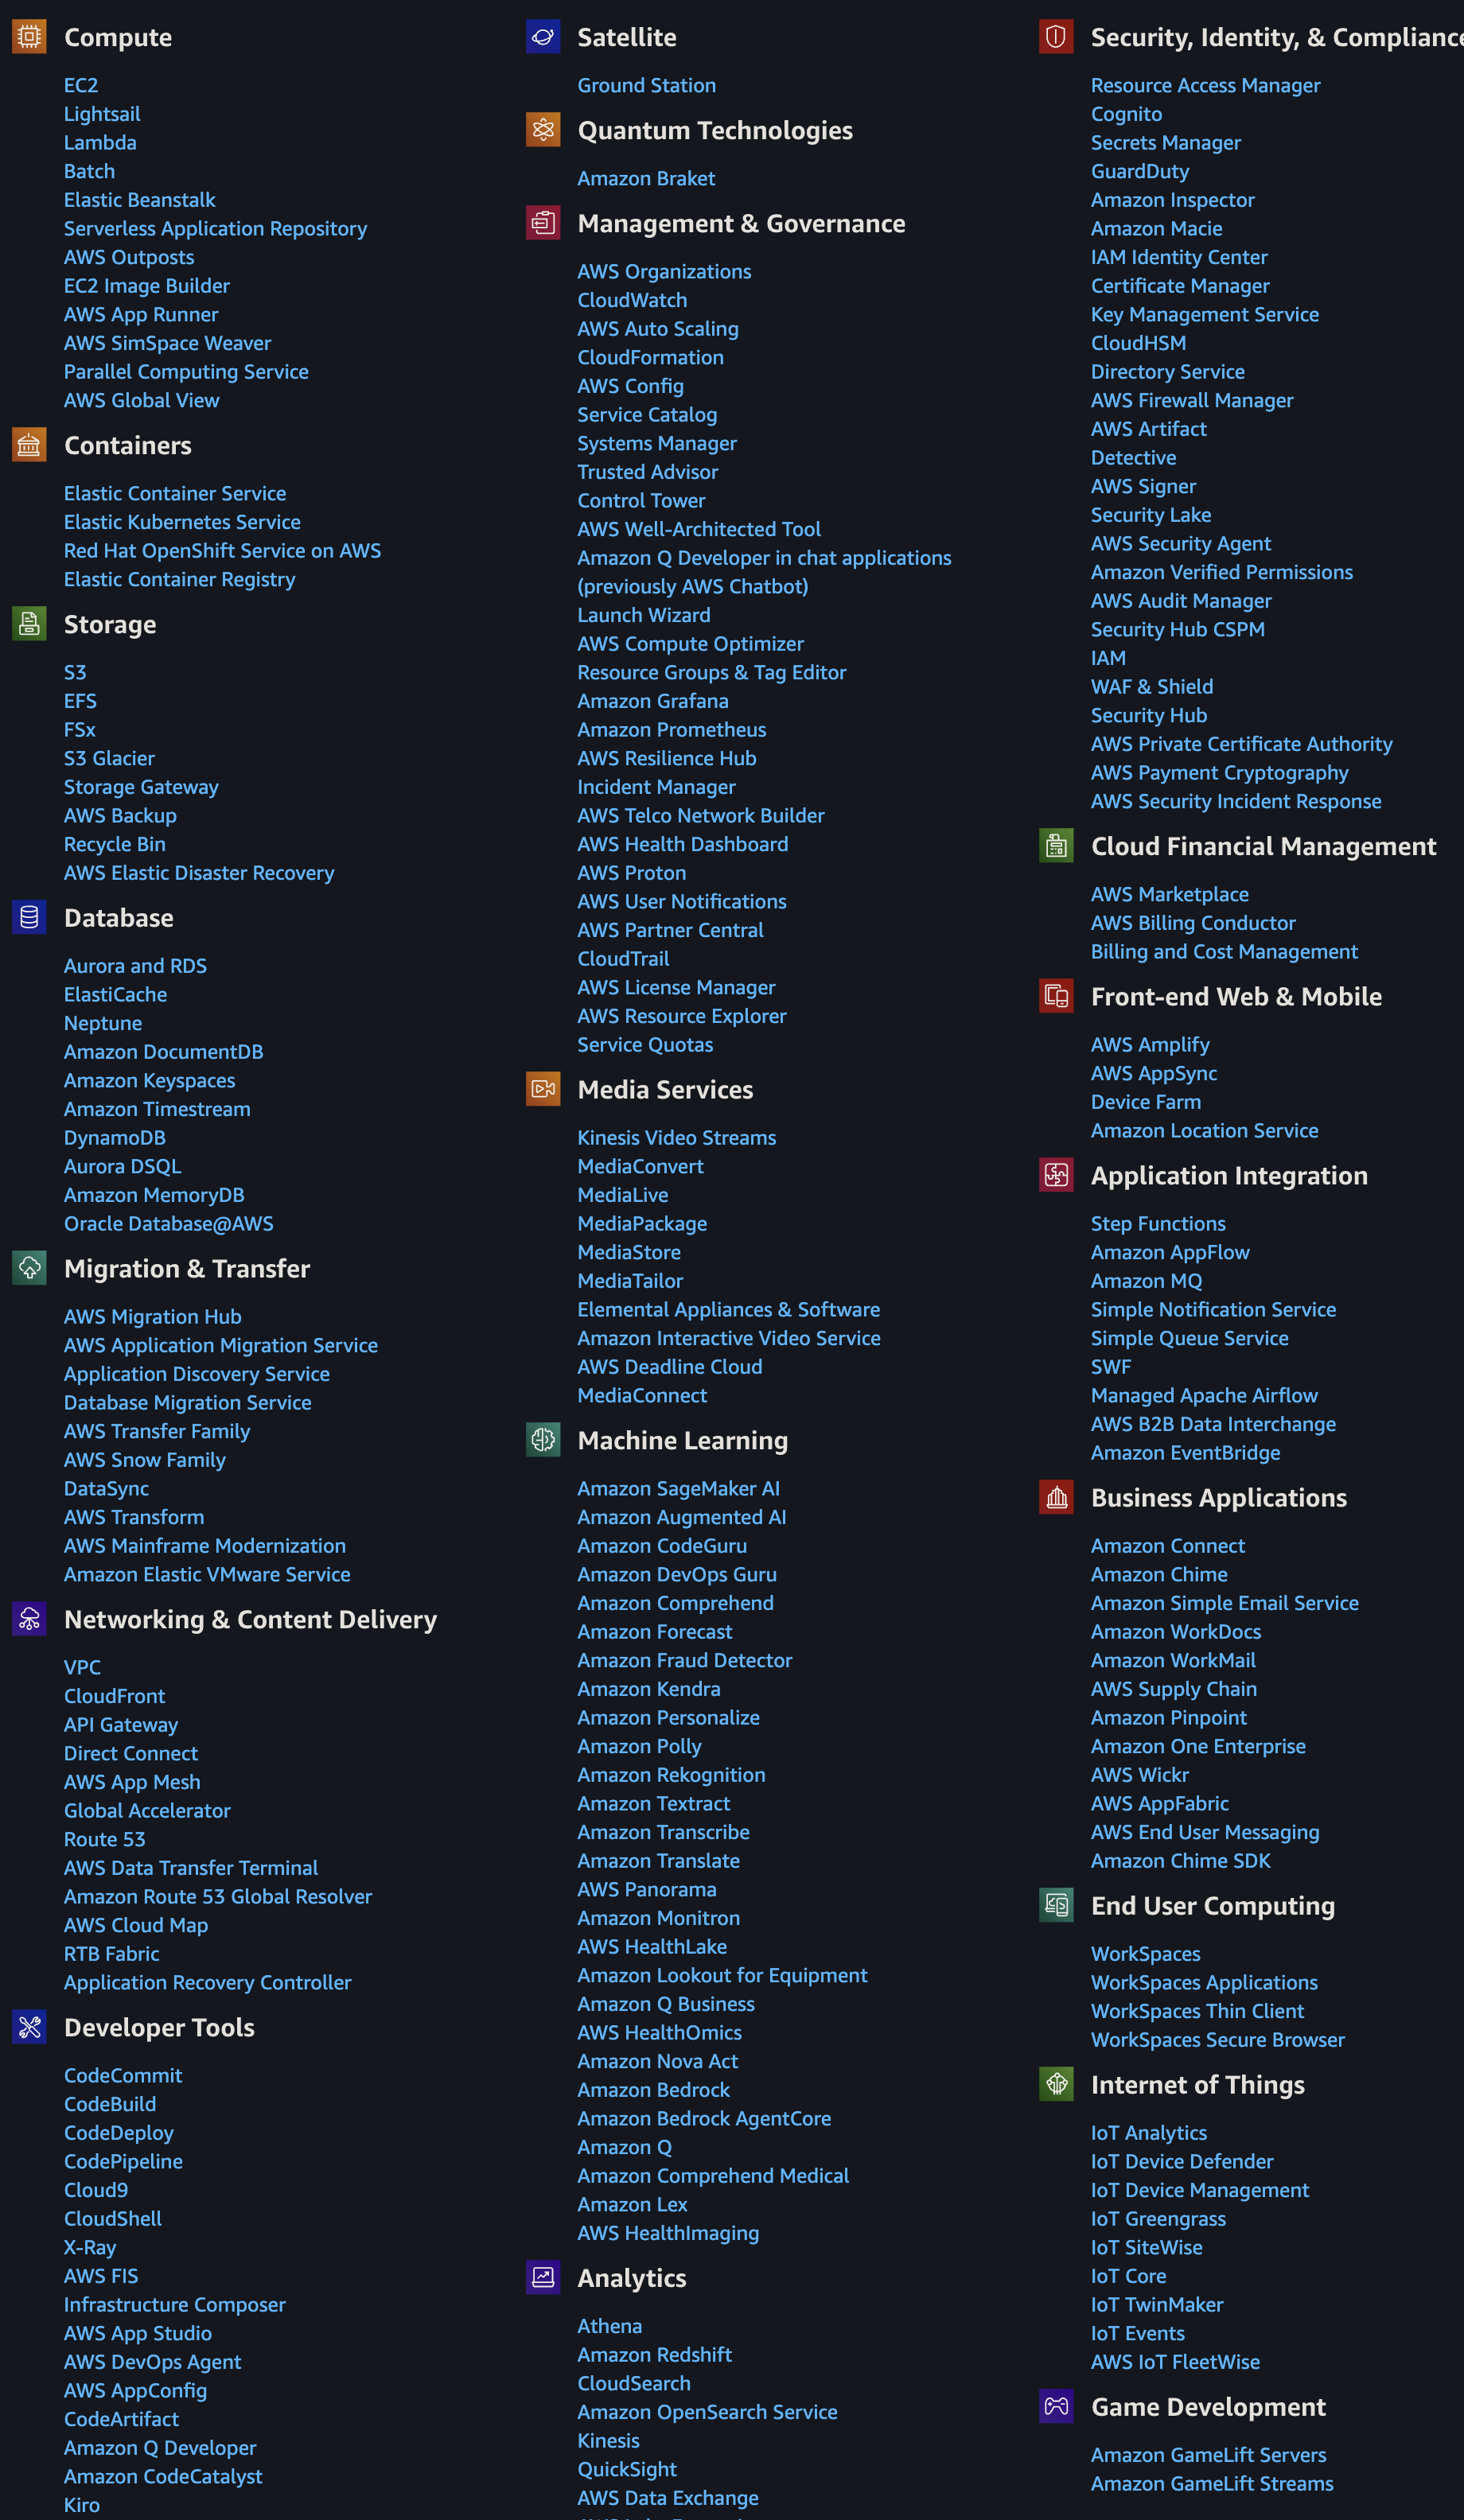
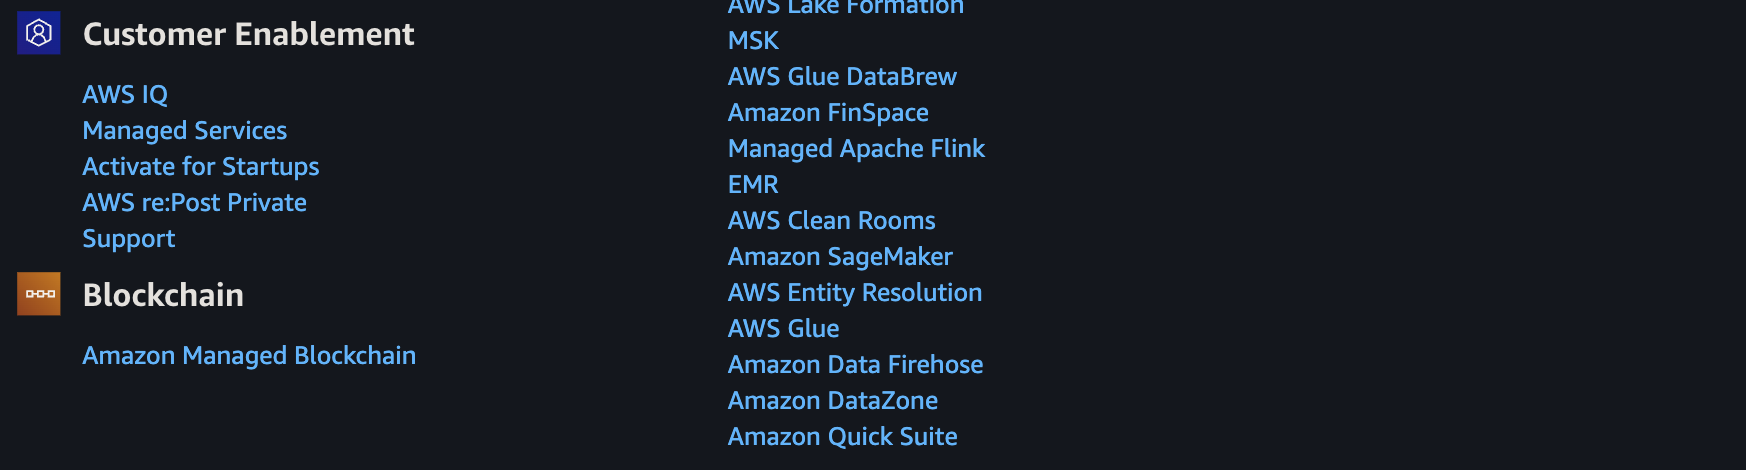
Filter the 264+ AWS Products listed alphabetically at https://aws.amazon.com/products/ or my page of each product’s codes and URL links.
-
Click a link below to directly reach the hub page for each of 20+ categories of AWS product:
- Analytics (datalakes): Streaming, Data lakehouse, Data warehouse, Data lake, Data processing, Business intelligence, Search analytics, Data and AI governance
- Application Integration Hub
- Artificial intelligence Hub
- Business applications Hub
- Compute Hub
- Custome Experience (Contact Center) Hub (Amazon Connect)
- Databases Hub
- Developer Tools Hub
- End User Computing Hub
- Game Tech Hub
- Management Tools Hub (and Governance)
- Media Services Hub
- Migration & Modernization Hub
- Multicloud & Hybrid Hub
- Networking & Content Delivery Hub
- Operations Hub
- Security & Identity Hub
- Storage Hub
- (AWS) Supply Chain Hub
My AWS Service Catalog page provides different ways to instantiate entire applications.
Types of AWS accounts
PROTIP: There are several different sign-up processess:
-
If you want to create an individual (stand-alone) account (using a free email account such as Gmail) unaffiliated with any company, click the “Sign up” button at:
https://signin.aws.amazon.com/signup?request_type=registerPROTIP: CAUTION: To stop fueling phishing attempts, create new email addresses for use in AWS so that you don’t expose it in public social media. Emails used for managing AWS production accounts should be used only for managing AWS and not for regular email use, social media, and shopping.
Individual accounts have use of designated Free Tier resources for a period of time.
-
If you’re a student or educator with an “.edu” email:
https://aws.amazon.com/education/awseducate/ for program: AWS Academy, Cloud Institute, Educate, re/Start, Skill Builder, Skills Center.- https://www.awseducate.com/registration/s/learner-faqs#jobs
- https://www.awseducate.com/registration/s/learner-faqs#emerging-talent-community AWS Emerging Talent Community when you earn digital badges
Education accounts also have use of a Free Tier.
-
If you’re using your corporate email, check with your IT department, which typically use AWS Organizations and federated Single-Sign-On to enable enterprise scaling. It involves definition of Organizational Units (OUs) to specify additional security controls that enable consolidated billing, policy-based controls (SCPs), resource sharing, and organized account structures.
CAUTION: Switching to use <a href="#AWSOrganizations">AWS Organizations</a> before the end of the individual <a href="#FreeTier">Free Tier</a> period automatically <a target="_blank" href="https://docs.aws.amazon.com/awsaccountbilling/latest/aboutv2/free-tier-plans.html">upgrades the account to a paid plan</a>. -
If you’re working with an AWS salesperson assigned to a business:
https://aws.amazon.com/resources/create-account/ -
To use a .gov (US government) cloud:
https://aws.amazon.com/government-education/government/ -
If you want the AWS-affiliated cloud in China, that’s a whole different ecosystem. See
https://www.amazonaws.cn/en/about-aws/china as China law dictates that foreign companies cannot own cloud computing infrastructures within the country.
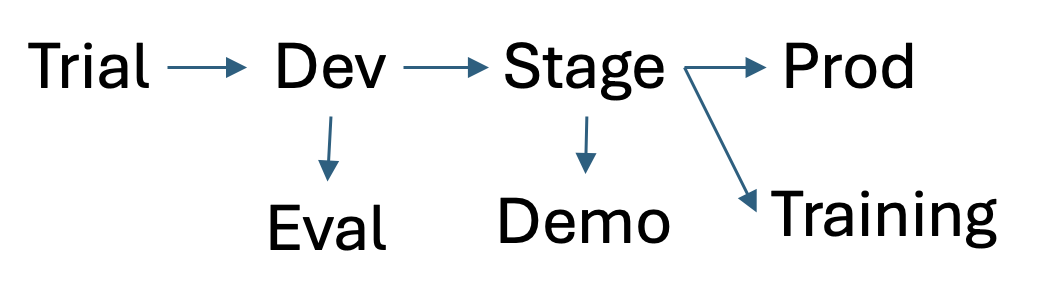
NOTE: Separate environments (aka sandboxes) need to be created so that different changes can be evaluated at each levels of maturity, simultaneously: dev (development), performance testing, training, staging, production, etc.
Ways to create resources in AWS
Console Console GUI, Terminal CLI, Python* API, IoC JSON:
-
Visually clicking and typing on the internet browser “AWS Management Console” at https://console.aws.amazon.com. The Console is used during initial setup to create and configure, then lock down a Root Account. Authentication is by user name and password plus MFA (such as the Authy app).
SECURITY PROTIP: At many enterprises, ad hoc use of interactive CLI and Console GUI, especially in production environments, are not permitted. Instead, only automated mechanisms such as API calls by IaC (such as CloudFormation and Terraform) are allowed because those mechanisms have version controls and repeatability.
-
Textually typing in the CLI (Command Line Interface) provided by the MacOS/Linux Terminal or Windows PC Command (cmd) utility. The AWS CLI program is installed for aws commands to be executed interactively or within interpretive Bash scripts scheduled in batch jobs. Authentication is by aws configure command which stores credentials aws_access_key_id and aws_secret_access_key= in an unencrypted file at ~/.aws/credentials.
-
Programmatically running custom program code (such as Python, JavaScript, etc.) which call AWS APIs (Application Programming Interface) called by custom programs calling AWS’s API (Application Programming Interface). Amazon’s Boto3 SDK and Pulumi.com use this approach. This is the mechanism behind the scenes by mobile apps. Authentication is by including APIKeys generated by AWS.
Boto3’s support for Python 3.9 ended April 29, 2026.
Boto3’s support for Python 3.8 ended October 31, 2025.Amazon open-sourced its CDK (Cloud Development Kit) as a SDK layer above CF, at the cost of making troubleshooting more complex. A library of “constructs” in TypeScript, JavaScript, Python, Java, .NET C#, and Go. An example in Python to create an Amazon Elastic Container Service (Amazon ECS) service with AWS Fargate launch type:
 class MyEcsConstructStack(Stack):
    def __init__(self, scope: Construct, id: str, **kwargs) -> None:
       super().__init__(scope, id, **kwargs)

       vpc = ec2.Vpc(self, "MyVpc", max_azs=3)     # default is all AZs in region
       cluster = ecs.Cluster(self, "MyCluster", vpc=vpc)
       ecs_patterns.ApplicationLoadBalancedFargateService(self, "MyFargateService",
          cluster=cluster,            # Required
          cpu=512,                    # Default is 256
          desired_count=6,            # Default is 1
          task_image_options=ecs_patterns.ApplicationLoadBalancedTaskImageOptions(
             image=ecs.ContainerImage.from_registry("amazon/amazon-ecs-sample")),
          memory_limit_mib=2048,      # Default is 512
          public_load_balancer=True)  # Default is False
A “stack” of several constructs may be needed.
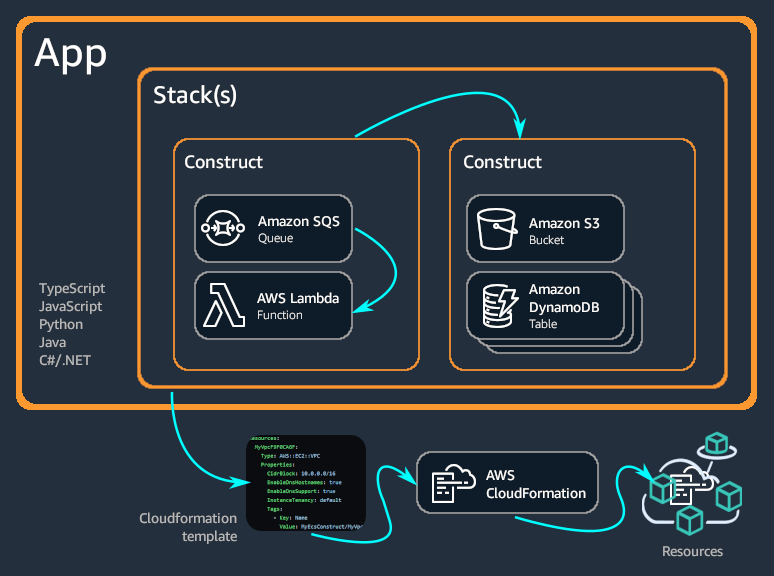
Each construct creates Cloud Formation files AWS uses to create resources.
CDK provides no built-in support for Secrets Management. But Pulumi provides built-in support for encrypted secrets. It also supports third-party providers.
Policy as Code.
-
Declaratively running Infrastructure as Code (IoC) DSL (Domain Specific Language) definitions to define the desired state of the AWS environment. This makes it easier to track changes and repeat the same environment in different regions within different accounts.
Cloud Formation (CF) was created by Amazon and only works within AWS. So its use would likely enable you to automate the latest tech AWS has to offer.
Download AWS Cloud Migration Factory template text file (6119 lines).
CF makes use of GitHub for tracking changes and to provide an AWS deployment role.
ECS web apps with VPC, ECS/Fargate or Lambda, RDS/Dynamo can all be defined in CDK. A GitHub Actions workflow runs cdk synth and cdk diff on PR, cdk deploy on merge.
Use of IaC makes it easier to evaluate the vulnerabilities and costs of an environment even before it is created. Authentication is by including APIKeys generated by AWS.
Alternatives for IoC on AWS include Hashicorp CDKTF, Hashicorp Terraform directed acyclic graphs, OpenTofu, Spacelift, Firefly, Scalr cloud, Red Hat Ansible, Crossplane (inside K8s clusters), SkyPilot (GPUs), etc.
Some of these are able to use Open Policy Agents (OPA) to define and enforce policies for security, accurate billing, etc. https://www.youtube.com/watch?v=RTEgE2lcyk4&t=1332s
-
Visibly reading from AWS Console Mobile app month-to-date costs, CloudWatch alarms triggered, and AWS Health issues identified.
AWS Mobile App on smart phones
-
Get the AWS Console app on your mobile phone:
On Google Android mobile phones
On your iPhone, open the Store app and search to get AWS Console. Make sure the publisher is AMZN Mobile LLC which creates all Amazon’s apps.
PROTIP: These apps got low review scores because the app only lets people read-only, but not change anything. And the 2FA is clunky.
- Add an identity: select Root/IAM account or Federation.
- Enable Face ID on iPhones.
-
Provide email, CAPTCHA security, password, email verification code. Success is seeing this:

Ecosystem Flowchart
Let’s jump right inside the heart of the technology:
- Click on this flowchart for a movie about the simplified sequence to establish an essential corporate IT ecosystem:
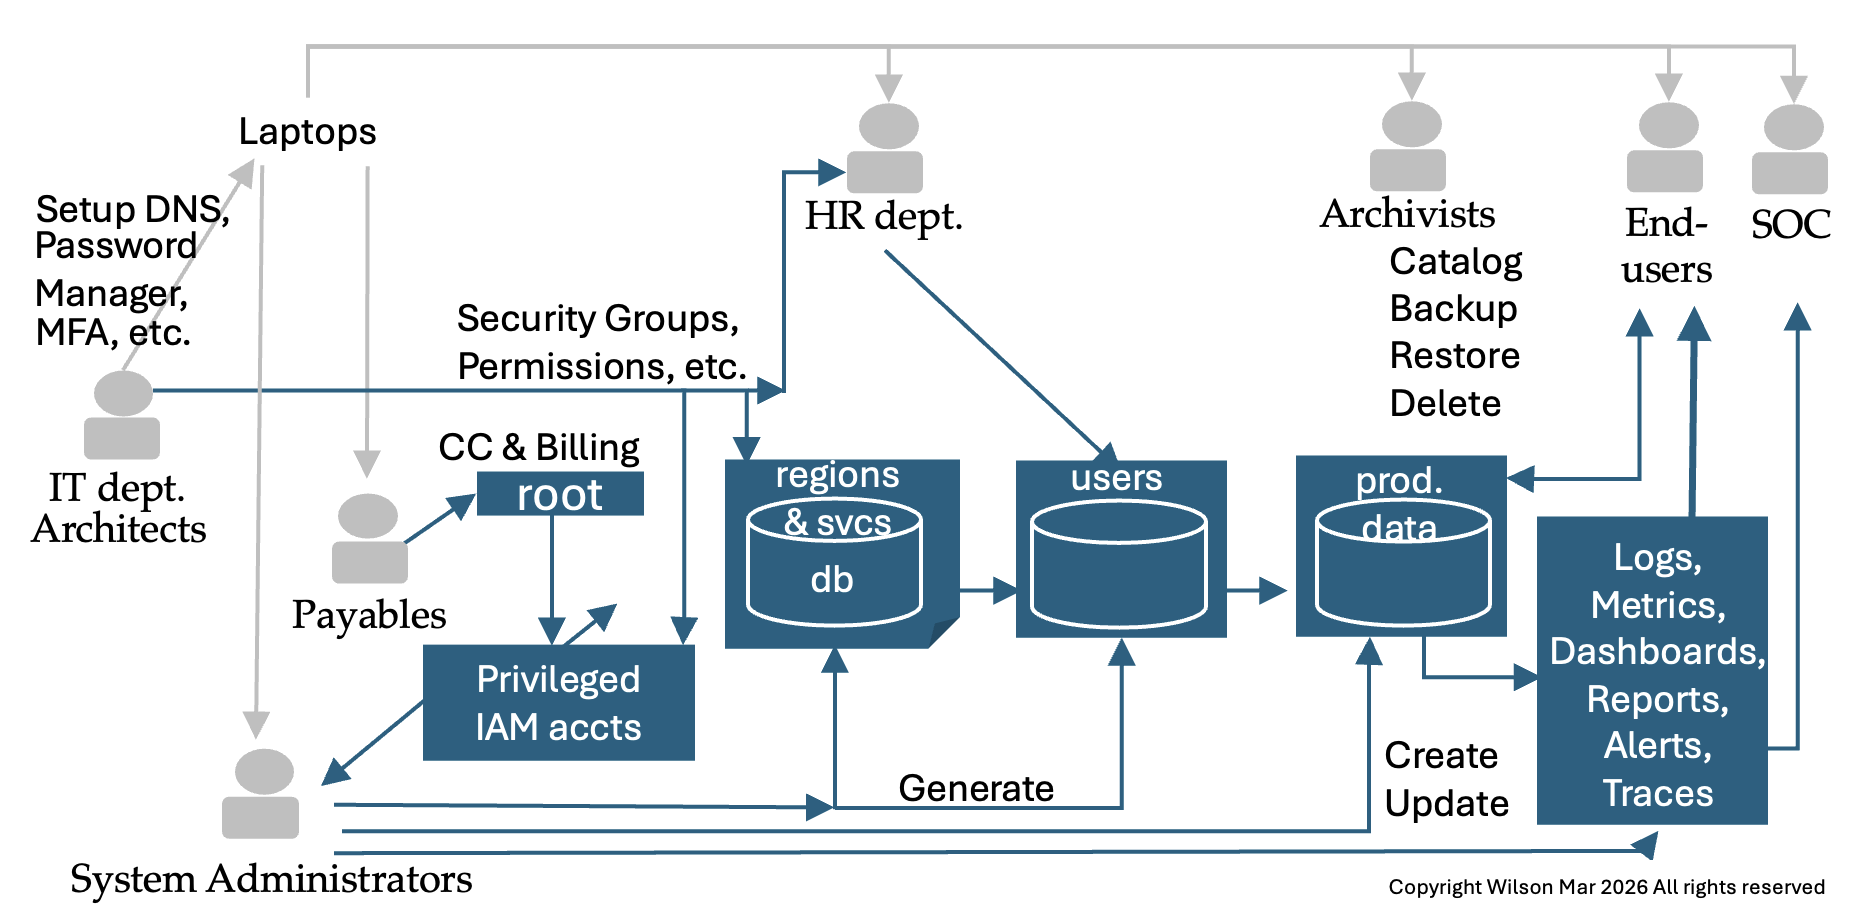
All this work can be done by one person. But “separation of duties” is shown how different departments can enable scaling and technical specialization.
- The IT department obtains and configures laptops with secure DNS settings,
- Password Manager, and utilities to keep secrets on and off computers.
-
Architects define what services are used within each region.
Regions not used are disabled to prevent rogue charges from accumulating.
- Architects also define policy files to specify the actions on AWS resources that each AWS Security Group is allowed to use.
-
People handling Payables are fudiciaries of the AWS Root Account created with the credit card charges for billing.
PROTIP: Passage of account ownership should be recorded with time stamps and signatures of the parties involved, with a witness present.
PROTIP: NAMING CONVENTION: Include in the name of each root account the date when initial Free Tier ends. Starting in 2026, that’s six months instead of 12 months previously.
PROTIP: Since the root account has “God-mode” capability to do anything, it is NOT used after it is used to create a set of “IAM accounts”, each with some limitations, which many call “Least Privilege” to do each job.
-
Each IAM account is associated with URLs and secrets used to login.
https://1234567890123.signin.aws.amazon.com/console
-
The first to receive credentials are System Administrators who build applications and databases.
PROTIP: Using “IaC (Infrastructure as Code)” means that configurations are defined as a set of codes rather than interatively using a GUI. This approach enables the status of a system built that way to be duplicated and analyzed during troubleshooting.
-
Generate a database of what services each region supports, and at what cost (by type of service).
Amazon Nepture is the AWS graph database offering.
- IAM accounts are created with permissions specific to what other groups do.
-
The HR (Human Resources) department maintains a list of people, their roles, and what parts of the system each is allowed use.
Each IAM Role is an identity that a trusted user or service temporarily “assume” to get a specific set of permissions to take specific actions on specified resources.
Each User Group is just a collection of IAM users that all need the same permissions.
When a Policy File is attached to a group, every user in that group automatically gets permissions defined in the policy.
- Production data is created and updated by
-
End Users.
PROTIP: AWS customers may be asked to use a different AWS account for each environment (development, testing, training, production, migration, etc.).
- In the current era of widespread randsomware, we have professional Archivists diligently catalog, backup, restore, and delete data. In many companies, to reduce the “blast radius” of hacks, Archivists are the only ones who can delete data.
-
The course of data being processed generates logs, metrics, dashboards, reports, alerts, and traces of events inside and outside the organization.
NOTE: These utilities for “Observability” and Governance are often larger than systems thy observe.
-
The SOC (Security Operations Center) monitor and provide rapid response.
- Managers in the SOC ensure that the appropriate notifications occur, with action taken in a timely.
Other roles include: Mobile Developers, Testers, Auditors, Product Managers, Network Administrators, Trainees, Contractors, Legal, Finance, etc.
A policy files is crafted to define what specific actions each role is enabled to take on specified resources. Actions include list, create, update, delete, etc.
Roles can also be defined for resources outside of AWS when using “AWS Roles Anywhere”.
RECAP static flowchart:
Setup stand-alone root account
These are steps to create a stand-alone root account.
- At https://aws.amazon.com/, click “Create Account” at the top-right corner.
- Type your email address which you will set aside as the root email address which you will next use in social media.
- For “AWS account name”, examples are “master-billing” but the email works too.
- Switch to your email tab to click the link to verify your email address.
- PROTIP: When providing answers to Security Challenge Questions, do not specify the real answer, which someone stole or figured out through social engineering. Instead, answer with nonsense
- Write that secret information down in your password manager.
-
Compe up with a strong password.
PROTIP: Use 1Password so that you can easily generate up to 64 character password, but remember only one password to access the 1Password database of secrets. 1Password encrypts its database so that you can make backups (to a USB drive or secure cloud). I favor 1Password because it provides a way to sync changes with your smartphone without going through the internet.
Because you only have to remember one master password, you can are free to change various passwords as often as you want with no fear of forgetting them.
- So you don’t create a typo, from the password manager, copy the password and paste it into the password field.
-
Paste the password (so you write a typo) into a text file, print it out to paper, and put that in your fire-proof vault.
Credit card
-
Switch to your credit card webpage (such as CapitalOne.com) and login. PROTIP: Generate a special virtualnumber only for the AWS account.
PROTIP: You need a credit card to open an account. But to limit exposure, some people provide to AWS numbers from a pre-paid reloadable Visa gift (debit) card pre-paid online (which has an expiration date and some have a monthly service fee).
- The Blue Card from Walmart and American Express ends June 2026
- Discover bank card
- The Drawpay card provides a 1% refund on purchases and a mobile app to view balances. Others provide fee-Free cash withdrawal at over 25,000 MoneyPass ATMs.
-
In your password manager, write down the virtual number and switch back to AWS to paste that.
PROTIP: CAUTION: Once you give Amazon a credit card number, you cannot remove it. Amazon can continue to charge for it until the card expires in several years.
- In your password manager, type the expiration, and CVV card.
-
PROTIP: Setup automatic billing to your checking account and note that in your monthly budget app.
- Provide your phone number. PROTIP:If you provide a Google Voice virtual number, it would be less of a hassle in case you change the actual number of your phone assigned by your carrier. So in case you change phone vendors (from ATT to T-Mobile), you only need to change it in Google Voice. Not everyone accepts a Google Voice virtual number for SMS verification.
-
PROTIP: In your password manager, write down in that tag field the last 4 digits of the virtual number so you can easily find which accounts make use of that number.
-
In your password manager, write down the Account Id that appears in the upper-right corner of the AWS Console page, such as:
1234-5678-9876
AWS will ask for the Account Id when you ask for support.
Console navigation & configuration
-
In the blue pop-up, click “Continue” and “Try Now” to follow the tour. Click on a clear area of the screen to close the pop-up.
-
Click the gear icon at upper-right to select user settings: language and Visual mode (such as “Dark”).
- Click the “AWS” icon in the upper-left corner to return to your Console home page.
- PROTIP: Since you’ll be using this Console screen often, drag the Console tab all the way to the left.
-
PROTIP: Right-click the Console tab to Bookmark it so you can easily open it after logging out.
AWS Health
-
PROTIP: An important widget is the “AWS Health” widget. Drag its icon with the six dots to the top left of the page and let go.
Information presented by this widget appears in the AWS mobile app (below).
### Compare Support Plans
https://support.microsoft.com/en-us/home/contact?SourceApp=smcivr2
REMEMBER: Some AWS support plans add an additional 3% on top of charges each month.
-
Click Amazon’s Support Plan page here.
Admins call (800) 865-9408 or (800) 642 7676 (toll-free, US only). Outside the United States, see global support phone numbers.
The Basic account does not enable you to communicate with Amazon people who can answer technical questions.
The $29/month Developer Plan enables you to open an unlimited number of support cases only via email, with a 12-hour response time if “system impaired”. Otherwise, the SLA is 24 hours.
The $100/month Business Plan enables you to have 24/7 chat, phone, as well as email access with AWS Support people on an unlimited number of support cases, with a 1-hour response time for “production down” issues, or 4-hour response for “production impaired” issues.
Amazon’s Enterprise Plan for $15,000/month gets you 15 minute response on “business critical system down” issues. This plan also comes with an assigned TAM (Technical Account Manager).
These dollar amounts are minimums, not fixed prices.
https://aws.amazon.com/premiumsupport/programs/iem/ mentions “AWS Infrastructure Event Management (IEM) offers architecture and scaling guidance and operational support during the preparation and execution of planned events, such as shopping holidays, product launches, and migrations.”
-
Scroll down to mouse over the “$29” on the Pricing line at the bottom of the table.

PROTIP: Pricing for Developer support is the Greater of $29 or 3% of monthly AWS usage, so you will pay more than $29 if you spend more than $966.67.
- Scroll back up to click the “Pricing example” link on the right.
-
Notice that if your spend is $2,000, Amazon bills you $60 for support, not $29.

-
Click the “Business” and “Enterprise” buttons in the pop-up to see sample volume pricing tiers.
Support Center
-
To view support cases filed and their status, see:
https://console.aws.amazon.com/support/home
Policies for this are:
- AWSSupportAccess (Allows users to access the AWS Support Center)
- SupportUser (This policy grants permissions to troubleshoot and resolve issues in an AWS account. This policy also enables the user to contact AWS support to create and manage cases)
Create Forum Account
-
PROTIP: To ensure anonymity interacting on public forums, the Administrator should create in a public email system (such as gmail.com, hotmail.com, etc.) an email address for use on forums. Don’t use a real name in the email address, but a positive adjective with a number to ensure it’s unique, such as “concerned123”.
AWS says “Your email will be kept private” but I don’t trust that they can’t be hacked.
-
Go to the AWS forums at URL:
-
Register the new email address along with an AWS Nickname without a proper name, such as, again, “concerned123”.
-
Use that email in StackOverflow.com and other public forums.
Social Media
-
StackOverflow
-
https://www.twitch.tv/aws/videos/all videos include:
- IoT at re:Invent 2017 video with Sarah Cooper (General Manager IoT), Kip Larson (Principal Product Manager for IoT Analytics)
1 Sign-up to receive the AWS Architecture Monthly (FREE Subscription) on your Kindle account.
Job Roles
- Cloud Application Developer: Turn Ideas into Digital Reality
- DevOps Engineer: Ensure Smooth Cloud Operations
- Cloud Engineer: Build the Backbone of the Cloud
- Cloud Administrator: Safeguard and Optimize the Cloud
- Cloud Support Engineer: Solve Complex Challenges
The actions which can be performed on each resource is defined by role policies in a json file.
REMEMBER: JSON files (by design) do not allow for comments.
Those who add/manager users and their policies are given Customer managed policy “user-policy-mgr-1.json” from my github.com/wilsonmar/aws-quickly repo.
Separation of Duties and Concerns
-
PROTIP: To follow Separation of Duties (SoD) principles, the account should be owned only by a company’s Accounts Payable department under the corporation’s Controller and not by operational or IT staff. this should be announced by a corporate office as company policy.
-
In an enterprise when several people or departments are involved, create a sub-account for use with each level of processing, to provide individual traceability and accountability.
-
A Global Adminstrators creates a set of sub-accounts and do not use the root account again except for emergency purposes.
It’s common for a separate account to be created for each department and project as well as each user. This is to limit the “blast radius” when an account’s credentials become compromised, a situation we need to prepare for.
Role Groups for Permissions
Each role group typically have different permissible Actions:
PROTIP: Organizational policies are installed by my Python script __ which automates creation of role groups by processing policy json files.
My sample iam-policy-groups.csv file is read to define profiles and what they do:
SysAdmin  : Define user groups, actions, roles, policies
HR        : Create users with info & assign role groups : GetObject, CreateObject, ListObject
Users     : Assume role to create & Edit S3 objects within defined region(s)
Archivist : DeleteObject
If you are the sole operator of AWS at a one-person outfit, you would switch among these profiles after signing in with the IAM Account (and associated password & MFA).
My sample iam-users.csv contains:
HR,"Dave Ulrich"
SysAdmin,"Rusty Shackleford"
User,"Edward Snowden"
Archivist,"J. Franklin Jameson"
PROTIP: Notice that only Archivists can delete within Production environments. Other accounts are not allowed to delete to minimize exposure to ransomware, which delete data after encrypting.
Permissions in JSON policy files
The permissions which each role group has are defined created has its own a separate AWS Account.
Permissions for each role, role AWS Account are defined in a JSON Policy file such as this:
{
  "Version": "2012-10-17",
  "Statement": {
    "Effect": "Allow",
    "Action": "s3:GetObject",
    "Resource": "arn:aws:s3:::bucket???/*",
    "Condition": {
      "StringEquals": {
        "aws:ResourceTag/Department": "${aws:PrincipalTag/Department???}"
      }
    }
  }
}
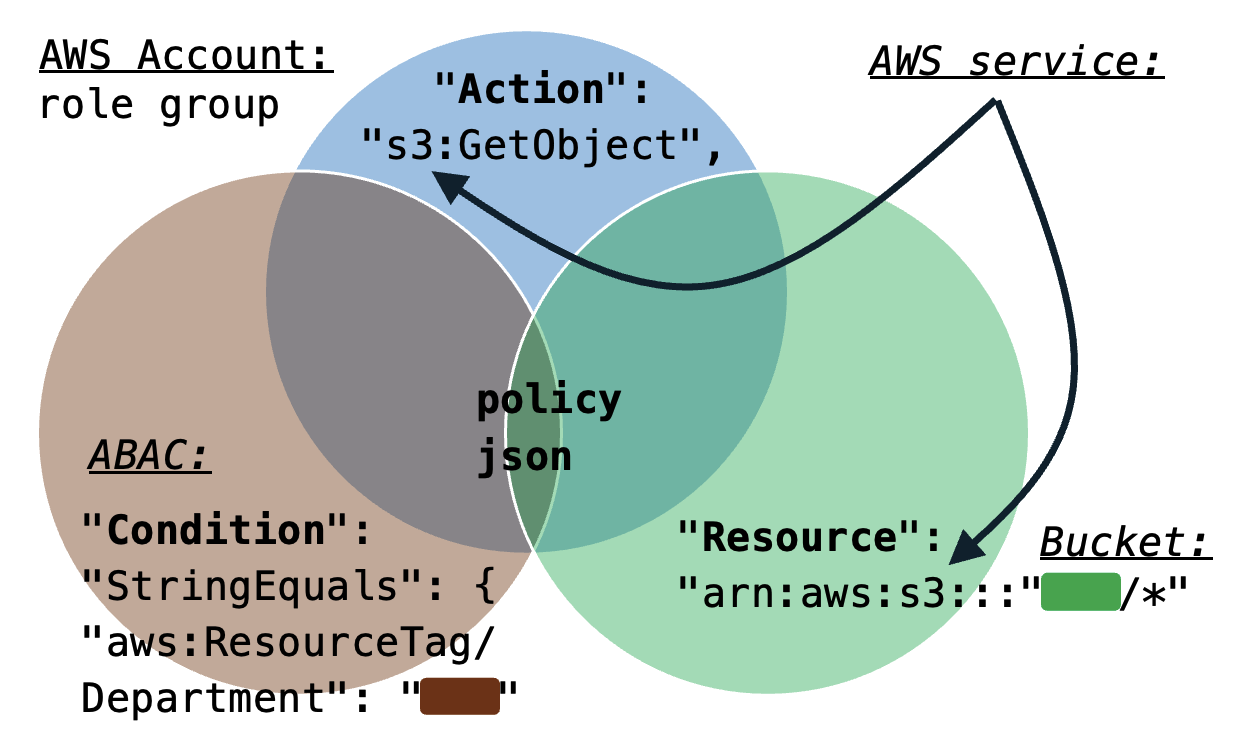
Permissable Actions on Resources for a service. For the S3 service, buckets. Optionally, conditions for Account Based Access Control make use of conditional Tags (such as a Department name) to accumulate cloud charges.
Ignore Security Messages
CAUTION: It is NOT good security to allow everyone to list all instances of every type of resource. But yet AWS throws up red error messages about lack of permissions as if that’s a bad thing.
PROTIP: We issue permissions for only an account’s own resources rather than “*” to all.
PROTIP: Under “Least Privilege” and “Zero Trust” principles, System Administrators and programs who set permissions are themselves given permissions to grant permissions only for a specific AWS Account at a time, for a short period of time.
PROTIP: We run audits to ensure that’s the case.
Condition Tag Metadata
Tag metadata added to policies for reference by enterprise utility programs which scan all policies to review at a specified date by its designated Owner:
iam = boto3.client('iam')
iam.tag_policy(
    PolicyArn='arn:aws:iam::123456789012:policy/MyPolicy',
    Tags=[
        {'Key': 'Purpose', 'Value': 'S3 read access for analytics'},
        {'Key': 'Owner', 'Value': 'data-team'},
        {'Key': 'CreatedDate', 'Value': '2026-02-16'},
        {'Key': 'ReviewDate', 'Value': '2026-08-16'}
    ]
)
Condition Tags (Attributes) for ABAC
VIDEO: Attribute Tag values such as a Department
Attributes include department, project, cost center, location, or other fine-grained tag-value pairs attached to AWS principals (like users or roles) or resources (like S3 buckets, KMS keys, or SQS queues). Attributes are used for ABAC (Attribute-Based Access Control) for AWS to grant access based on attributes, such for SCIM (Cross-domain Identity Management) with Microsoft Active Directory.
Automation
My Python script, __, creates AWS Accounts for individual users, then grants each user permissions by associating each user to a role group.
PROTIP: Automation makes security admin. more efficient. The state-of-the-art is to identify when a request is denied,immediately and automatically make a request to create the policy needed.
BLOG: This Enables coexistence with RBAC, allowing organizations to adopt ABAC (Attribute-Based Access Control) alongside traditional role-based strategies.
https://www.youtube.com/watch?v=hAk-7ImN6iM
Granted service to assume role
Granted encrypts cached credentials to avoid plaintext SSO tokens being saved on disk.
Granted stores SSO access token in the system’s keychain rather than on disk.
- Install open-source Granted CLI (from Common-Fate):
brew tap common-fate/granted
brew install common-fate/granted/granted
✔︎ JSON API cask.jws.json Downloaded 15.3MB/ 15.3MB ✔︎ JSON API formula.jws.json Downloaded 32.0MB/ 32.0MB ==> Tapping common-fate/granted Cloning into '/opt/homebrew/Library/Taps/common-fate/homebrew-granted'... remote: Enumerating objects: 772, done. remote: Counting objects: 100% (160/160), done. remote: Compressing objects: 100% (120/120), done. remote: Total 772 (delta 39), reused 0 (delta 0), pack-reused 612 (from 1) Receiving objects: 100% (772/772), 108.62 KiB | 427.00 KiB/s, done. Resolving deltas: 100% (192/192), done. Tapped 2 formulae (14 files, 143.9KB). Warning: Calling `depends_on macos: :high_sierra` is deprecated! There is no replacement. Please report this issue to the powershell/homebrew-tap tap (not Homebrew/* repositories): /opt/homebrew/Library/Taps/powershell/homebrew-tap/Formula/powershell.rb:33 ==> Fetching downloads for: granted ✔︎ Bottle Manifest granted (0.38.0) Downloaded 7.6KB/ 7.6KB ✔︎ Bottle granted (0.38.0) Downloaded 10.9MB/ 10.9MB ==> Pouring granted--0.38.0.arm64_sequoia.bottle.2.tar.gz 🍺 /opt/homebrew/Cellar/granted/0.38.0: 9 files, 36.9MB ==> Running `brew cleanup granted`... Disable this behaviour by setting `HOMEBREW_NO_INSTALL_CLEANUP=1`. Hide these hints with `HOMEBREW_NO_ENV_HINTS=1` (see `man brew`).
- List version and sub-commands:
granted hNAME: granted - https://granted.dev USAGE: granted [global options] command [command options] [arguments...] VERSION: 0.38.0 COMMANDS: browser View the web browser that Granted uses to open cloud consoles settings Manage Granted settings completion Add autocomplete to your granted cli installation token Deprecated: Use 'sso-tokens' instead sso-tokens Manage AWS SSO tokens uninstall Remove all Granted configuration sso Manage your local AWS configuration file from information available in AWS SSO credentials Manage secure IAM credentials credential-process Exports AWS session credentials for use with AWS CLI credential_process registry Manage Profile Registries console Generate an AWS console URL using credentials in the environment or with a credential process. login Log in to Glide [deprecated] experimental, exp cache Manage your cached credentials that are stored in secure storage auth Manage OIDC authentication for Granted request Request access to a role doctor Run diagnostics locally to help debug common issues relating to granted and aws rds Granted RDS plugin common-fate, cf Interact with your Common Fate deployment eks Granted EKS plugin help, h Shows a list of commands or help for one command GLOBAL OPTIONS: --verbose Log debug messages (default: false) --aws-config-file value --help, -h show help --version, -v print the version
- List roles defined:
assume - Use Granted to assume a role:
assume role-a[role-a] session credentials will expire 2026-02-21 16:47:33 +0000 GMT
https://granted.dev/browsers
- Assume role:
aws sts assume-role --role-arn arn:aws:iam::ACCOUNT:role/ROLE --role-session-name SESSION
Policy Simulation
https://policysim.aws.amazon.com
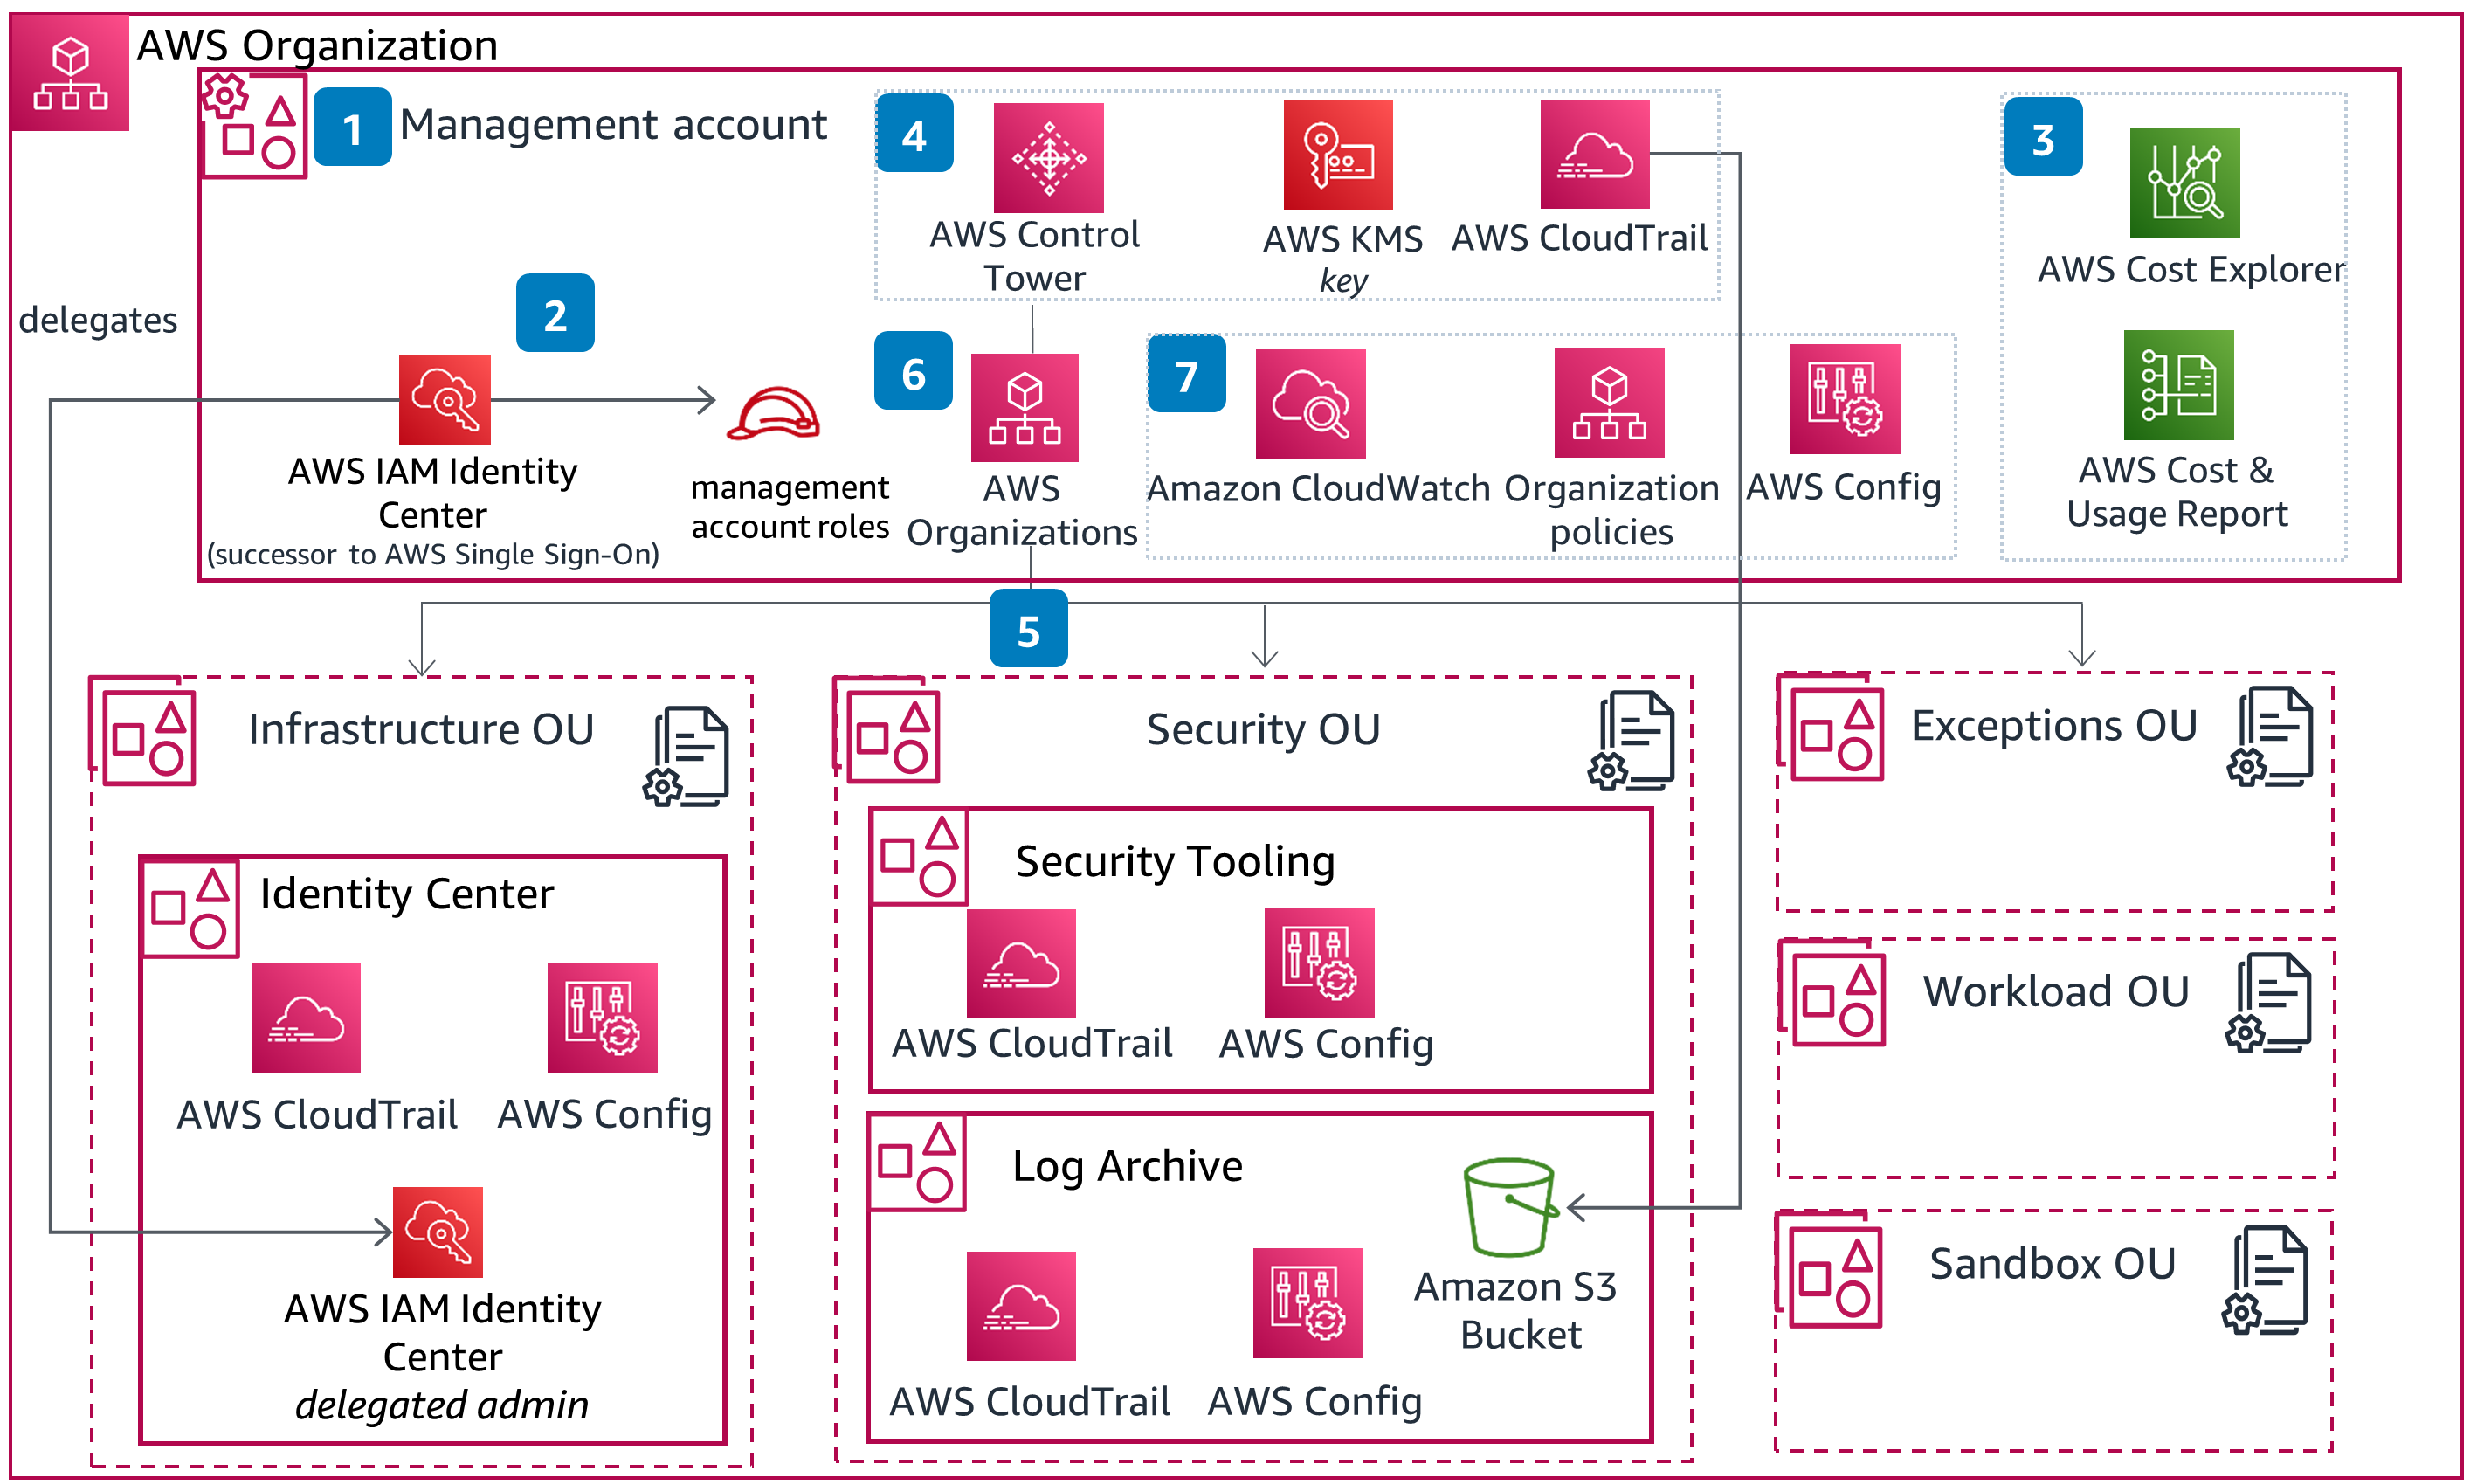
AWS Organizations
SECURITY PROTIP: Although this is shown in some tutorials, do not provide access to [Prod] resources using individual AWS accounts! Credentials for individuals are disabled when that person leaves the organization.
VIDEO: The AWS Organizations service enables central management of multiple AWS accounts used by an organization. Here’s what it does:
- Create and organize accounts into a hierarchical structure using Organizational Units (OUs)
- Apply Service Control Policies (SCPs) to restrict what actions accounts can perform
- Share resources across accounts
- Centrally manage billing with consolidated billing to achieve volume discounts.
- Automate account creation
 </a>
</a> - (CFLZ1-P2) Create an AWS account using a planned naming convention for root user email and account alias, secure root user account, and configure billing and tax information.
- (CFLZ1-P4) Create and configure AWS IAM Identity Center and standard management account roles for administrative management. Apply security configurations to IAM Identity Center settings.
- (CFLZ1-P3) Activate AWS Cost Explorer and create and configure AWS Cost & Usage Report.
- (CFLZ1-P5) Plan and deploy AWS Control Tower from identified parameters and secure your log data through AWS Key Management Service (AWS KMS) encryption. Apply an additional AWS Control Tower setting for landing zone. Set up AWS CloudTrail to deploy CloudTrail to all AWS member accounts, delivering logs to Log Archive S3 Bucket.
- (CFLZ1-P6) Build foundational Organizational unit structure on top of your Control Tower deployment.
- (CFLZ1-P7) Establish and deploy AWS Tag Policies. Activate cost allocation tags.
- (CFLZ1-P8) Deploy additional foundational security hardening configurations to your environment to include CloudWatch monitoring and AWS Config to management account, apply additional service control policies through AWS Organizations.
AWS Control Tower
Add AWS Control Tower uses AWS Organizations under the hood to automate a standardized setup of a secure, compliant multi-account environment with guardrails to ensure AWS best practices. It adds:
- Pre-configured account structure and OUs (like Security, Sandbox, Production)
- Automated account provisioning through Account Factory
- Pre-built guardrails (preventive and detective controls) that implement AWS best practices governance
- A landing zone - a well-architected multi-account baseline environment
- Centralized logging and monitoring automatically configured
- A dashboard for visibility and compliance status
- Drift detection to ensure your environment stays compliant
Control Tower enables IAM Identity Center to quickly switch among several user accounts.
IAM Identity Center SSO
VIDEO: Amazon’s “IAM Identity Center” service was previously called AWS Single Sign On (SSO). That’s why its CLI commands are: aws sso</tt> and region-specific URL such as:
Identity Center federates access to Salesforce, Box, Microsoft 365, GitHub, and other cloud apps enabled with SAML 2.0 or OIDC federation. This is part of being Well-Architected.
AWS Identity Center obtains from centralized identity providers are attributes from federated corporate-wide directories in iDPs (identity providers):
- Cisco
- CyberArk
- Duo
- Fortinet
- Okta
- Ping Identity
- ForgeRock
- Microsoft Entra ID (formerly Active Directory (AD))
- SailPoint
- Salesforce
- Oracle
Amazon Cognito works with external identity providers that support SAML and OpenID Connect, and with social identity providers like Facebook, Google, and Amazon. Your app can sign in a user with a user identity pool or an external IdP, then retrieve resources on their behalf with customized temporary sessions in an IAM role through the >AssumeRoleWithWebIdentity API operation.
IMPORTANT: Using AWS SSO avoids the security concern of storing long-lived IAM credentials on your local device.
PROTIP: Use of SSO add this into the AWS credentials file:
[sso-session my-sso]
sso_region = us-east-1
sso_start_url = https://my-sso-portal.awsapps.com/start
sso_registration_scopes = sso:account:access
Access key ID & Secret access key
Preparations for highly secure use of AWS
PROTIP: The distinctive aspect of this tutorial is that you are trained to form habits like elite Olympic athletes so can brag like this:
“Instead of convenience, I consistently endure disciplines that enable me to be trusted by enterprises to keep assets safe from robbers.”
Laptop/Chromebook computer
-
Can a Chromebook with a relatively small amount of RAM and data storage be used to access AWS? YES!
AWS (Amazon Web Services) runs in Amazon’s data centers to provide on-demand access to computing resources, including servers, storage, databases, and analytics tools.
However, Amazon provides its “Outpost” service for its enterprise customers to use a modified form of AWS commands and services on servers those enterprises maintain on their own premises. There is also LocalStack which replicates fully functional cloud applications on local infrastructure. https://github.com/localstack/localstack
Either way, a Chromebook can be used to control AWS resources. However, a powerful laptop is useful to hold larger files and process them locally, perhaps off-line.
The AWS Appstream app is used to display streaming content (like Amazon Prime).
A Raspberry Pi 5 is powerful enough.
Secure DNS Configuration
-
Configure your computer to use DNS resolver addresses 9.9.9.9 and 149.112.112.112 so that Quad9.net automatically block malicious websites. Those who secure DNS w/ECS would use 9.9.9.11 and 149.112.112.11. When testing false positives, unsecure IPs 9.9.9.10 and 149.112.112.10 are used temporarily.
On macOS: https://quad9.net/news/blog/doh-with-quad9-dns-servers/
- Download the mobileconfig file from https://docs.quad9.net/Setup_Guides/iOS/iOS_14and_later%28Encrypted%29/
- Open the Apple Settings app. Click the “+”. Click to Open the profile. Continue.
- Click Install (or Continue then Install).
- Enter your Mac password when prompted.
- Click Install again to confirm.
Alternately on macOS Terminal, type sudo scutil> open > d.init > d.add ServerAddresses * 9.9.9.9 149.112.112.112 > set State:/Network/Service/PRIMARY_SERVICE_ID/DNS > quit
Password/Secrets Vault/Manager
-
On a trusted computer, establish a personal password manager (digital vault) for storing passwords and other sensitive information.
-
Store your password manager vault file on a password-protected removeable USB drive that has brute-force protection. If the Admin PIN is entered incorrectly 10 times in a row, brute force attack protection triggers a crypto-erase of the drive.
Linux users scared of PC Keyboard Loggers can get the Kingston Ironkey 200 32GB with a built-in battery-operated PIN pad for $136 from Amazon.
-
When you’re on a trusted computer, backup a copy of your secrets to keep in a safe place (fireproof & EMP-proof safe, etc.).
Windows and MacOS users can use, for $37.99 on Amazon, the Kingston Ironkey Locker+ 50 32GB provides automatic cloud backup (if you trust Kingston). It needs a USB-A to USB-C adapter.
Mobile phone
-
On your mobile phone, install app Authy (from Twilio) for MFA (Multi-Facator Authentication) which can be restored on new phones if you lose your phone. Troubleshooting AWS MFA PROTIP: In the United States, your phone number should be formatted as +1 followed by your number with no periods or dashes (for example, +13103207878.
-
Secure each 3rd-party account (AWS, etc.) with multi-factor authentication (MFA). Save recovery codes among Notes in your Password Manager.
AWS SkillBuilder account
-
Use your personal professional email address (such as “johndoe@proton.me”) when creating a personal AWS “Skill Builder” account at https://skillbuilder.aws which links to your AWS certifications for life. NOTE: Additional accounts & passwords are used for Amazon marketplaces, AWS Events, and AWS cloud work.
A different Chrome Profile per Email
-
Install and use the Google Chrome browser because it support https://support.google.com/chrome/answer/2364824”>People Profiles</a> can encapsulates each email’s own preferences, browse history, and cookies. Click your user icon at the upper-right to switch among profiles.
-
So you can ignore phishing attempts to common email domains and powned email addresses, create different emails for social media, professional, and governmental/banking activities. Use protonmail.com (now that gmail.com is no longer cool).
-
Create a different email
GitHub account
-
For each email used within AWS, create a GitHub account with SSH certificates.
GitHub
-
PROTIP: Open a GitHub account for each email address.
-
Setup GitHub SSH.
-
Setup GitHub identity.
Unique Browser Profile for Each Email
- Install Google Chrome because it has detection of malicious conditions.
- You will have several gmail addresses, one for each AWS account you create.
-
To avoid confusion between Google accounts, install the Multi Login Helper extension to create a new browser profile for each AWS account you create.
Multi-Account Chrome Extention
PROTIP: The Multi Login Helper extension is also useful for creating a new browser profile for each Google account you have.
Only the Google Chrome browser supports installation of the simultaneous sign-in multiple AWS accounts in the AWS Management Console GUI. This “Multi-Session” feature can be used to switch between for up to 5 AWS accounts, each in a different browser tab, each tab managed independently with unique credentials and other context. The feature was added Jan 16, 2025 in all Commercial Regions.
- Install the extension by visiting the AWS Extend Switch Roles Chrome Extension page.
- Click to “Enable it”.
-
In CLI, define the configuration using command aws config format
~/.aws/config or the %UserProfile% directory On Windows.
- Open a new browser tab for each account. See https://docs.aws.amazon.com/awsconsolehelpdocs/latest/gsg/multisession.html
- Use the command+’ key combination to switch among tabs.
- When a tab group is removed, the corresponding session will be automatically signed out.
AWS Profile
Follow these steps to create a profile account:
- Create a new email address for your AWS account.
- In your Password Manager app (such as KeepassXC), create a new entry to store the email, Account Name, password, Account ID, Secret info, Department, and other attributes.
- If you don’t have Google Chrome installed, install it.
- Open a Google Chrome app.
-
Click the person icon at the upper-right corner and sign in using your personal AWS “Skill Builder” profile email address.
Edit Your AWS Profile shown on
Community at https://aws.amazon.com/profile/community-public- AWS re:Post curated knowledge and a vibrant community
- AWS Builder Center at https://builder.amazon.com
- AWS Blogs at https://aws.amazon.com/blogs
- AWS Startups at https://aws.amazon.com/startups
- Amazon Quick Suite Community at http://community.amazonquicksight.com to “Find answers to your questions, learning resources, and events in” major cities and online, on YouTube
- AWS Merch Store
- forms and surveys on AWS Pulse
- online webinar registrations and content downloads
NOTE: AWS IQ (Experts on Demand) will be discontinued on May 28, 2026.
AWS Free Tier Benefits
-
Filter the 185 free services at https://aws.amazon.com/free which lists free tier offer details by catagory. Scroll down and click “Show 8 more”.
-
REMEMBER: Services only on the Paid tier have Free Trial period of varying number of days.
-
Notice within the “Cost and Usage” widget the days and date for credits remaining.
-
PROTIP: Create in your calendar an event to take action before your credits run out.
Since July 15, 2025, new AWS accounts are given just 6 months (182 days rather than a year) of free access to some AWS services.
Each new AWS account receives up to $200 in AWS Free Tier credits, for application towards eligible AWS services, such as AWS Amplify websites. All Free Tier credits must be used within 12 months of your account creation date. See https://aws.amazon.com/free/ https://docs.aws.amazon.com/awsaccountbilling/latest/aboutv2/free-tier.html
QUESTION: How to “earn up to USD $100 by completing various activities”?
-
Click your account number at the upper-right. Notice it also shows the credits remaining.
- Click “Account” in the pop-up that appears for a page from “Billing and Cost Management”.
- Click the blue icon with the three lines at the upper-left to toogle view of the left menu.
- Click the icon with the “i” at the upper-right to toggle an explanation of the page.
-
Click the blue icon at the right to toggle “Amazon Q” AI chatbot.
-
PROTIP: Add Alternative contacts for Billing, Operations, Security for notifications specific to those roles.
- There is a link for viewing your “Recently visited” widgets.
-
Click the icon with the three dots to the right of the “Recently visited” widget and select “Remove widget” to make room.
Specify Your Default Region settings
On the AWS Management Console signed in as the Root user:
- Click “Global” at the top-right of the screen to reveal the region selector pop-up.
- Click “Manage Regions” at the bottom-left of the pop-up.
- Scroll down to “AWS Regions”.
- Click all the Disabled regions that you are likely to use, then click “Enable” near the top.
- Select your default region. PROTIP: The speed of various regions may be imperceptable, but some regions can cost more than others.
-
PROTIP: Some regions you need to opt-in to use.
Availability Zones
For resiliance from failure, some services are processed in duplicate Availability Zones (AZs) within the same Region. Each AZ is physically separate from each other so a fire in one doesn’t bring down the whole Region. But data transfer between AZs within the same Region are typically 3-10 milliseconds.
Within some infrastructure services, AWS requests a choice of Availability Zones within a Region:
- EC2 instance
- EBS volume
- RDS instance
- FSx file system
- Redshift node
- VPC subnet
- macOS instances
Some services automatically span multiple AZs, by design:
- RDS Multi-AZ
- Auto-scaling on EC2
- Elastic Load Balancer
- Elastic Beanstalk Environment
Some services have multiple regions:
- AWS Backup Plan
- DynamoDB Global table
- S3 Replication
- RDS Read Replica
Local zones
Some larger cities have “Local Zone” type within a Region (such as Boston’s “us-east-1-bos-1a”) for some services:
- EC2 (some specific instance types)
- EBS volume
- RDS instance
- ELB (Application Load Balancer only)
- VPC subnet
WaveLength Zones
Amazon has “Wavelength zones” where it provides 5G mobile service.
Edge Locations
PROTIP: Amazon makes AWS Edge locations available in a completely distinct from AWS Regions.
For end-users of mobile apps, Amazon has established peer connections with mobile carrier (ISP) cell towers Amazon sells as CloudFront embedded into 900+ PoPs (Points of Presence) and Regional Edge Caches.
- Route 53 Zone
- CloudFront Distribution
- WAF Web ACL
- Lambda@Edge Function
Root account lockdown
- On a browser in the AWS Management Console signed in as Root user for your default region:
- Select “Sign in using root user email”. Paste the root email and password from your password manager.
- Switch to your email “Verify your identity” to copy the number.
-
Switch back to paste the number and “Verify and continue”.
MFA setup
-
Select an authenticator app unlocked by a manually entered PIN.
PROTIP: CAUTION: The US Supreme Court ruled that biometrics are not protected under the US 5th Amendment gurantees of self-incrimination. So police can use your biometrics without your permission.
- Click “Show QR code” to reveal it.
- In the Authy app, scroll down to click “+ Add Account”.
- Scan the QR code.
- Click “Save”.
-
Enter two consecutive codes from your authenticator app.
Service Search to IAM

-
In the AWS Console, press Option+S or click inside the Search box. Type “IAM” and press Enter for the “Identity and Access Management (IAM)” page for your region.
https://console.aws.amazon.com/iam/home
Inactivate Unused STS Regions
- Click “Account settings”.
- Scroll down to the Security Token Service (STS) Info “Endpoints” section.
-
Select each region you won’t use regularly. Confirm “Deactivate” each.
CAUTION: Don’t deactivate your default region.
Deactivate regions not used
On the same “Account settings” page:
-
Scroll down to “Security Token Service Regions” and deactivate regions your organization are not using.
PROTIP: Select a Region where most of your target users are located. New services are usually restricted to one region, such as N. Virginia or N. California where AWS does development work.
This task can be automated with CLI script using a custom list of regions.
A new account will have this:

The FAQ to this is at
https://aws.amazon.com/iam/faqs - Click “Roles” in the left menu.
- ???
-
Click “Delete your root access key”.
-
Check “Don’t show me this message again” and Continue to Security Credentials.
Region/AZ info from EC2?
PROTIP: You need permissions in “ec2:” To get_region_info:, you need “ec2:DescribeRegion”.
To get_availability zones, you need “ec2:DescribeAvailabilityZones”Apply an IAM password policy
-
Click “Manage Password Policy” so AWS will ensure that “strong” passwords are used (and not easy to guess ones).
BLAH: AWS defaults are terrible:

Over time, as hackers have access to more powerful computers that can guess passwords quicker, so larger passwords are necessary to make it more difficult to crack.
-
PROTIP: The largest Minimum password length AWS allows is 128 characters. But 1Password can generate up to only 64 characters. Practically, 22 characters is a reasonable minimum. Require at least one number (digits) and one non-alphanumeric symbol character.

STS Regions
-
Keep thieves from using regions you don’t usually use and thus won’t notice. Scroll down to “Security Token Service Regions” and deactivate regions you are not using.
PROTIP: The region is where most of your users are located. New services are usually restricted to one region, such as N. Virginia or N. California where AWS does development work.
MFA (Multi-Factor Authentication)
This has AWS text or call your smartphone (a virtual device) to make sure that it’s really you logging in.
- Click Activate MFA
- Click “A virtual MFA device”.
-
Click Next Steps.
Install MFA app
- On your iPhone or Android mobile app, open the Store app.
- Search for Google Authenticator app (if you don’t already have it installed).
-
Click “Get” to install it.
-
Click “Open”.
- In the the Google Authenticator app, click the “+” icon at the top of the screen.
- Click “Scan barcode”.
- Align the QR code (with the square of dots) within the green box.
- Wait for the Google Authenticator app to display two codes. Under the codes we want now begins with “root-account-mfa-device@” followed by the 12-digit Account Id.
-
Type the first code for the account into the AWS Console website “Authentication code 1”.
PROTIP: Do not type the space between numbers so that you enter only 6 digits.
-
Press Tab and type the second code in “Authentication code 2”.
PROTIP: A new code is created every minute.
-
Scroll down to click “Activate virtual MFA” at the bottom of the screen.
MFA in profile
To specify use of MFA in an assumed role provider profile, see this example of credentials file:
 [profile prod-access]
 role_arn=arn:aws:iam::123456789012:role/ReinventProdAccess
 source_profile=development

 [profile prod-full-s3-access]
 role_arn=arn:aws:iam::123456789012:role/FullS3Access
 source_profile=development
 mfa_serial=arn:aws:iam::18490616333:mfa/james
- Test on Console: VIDEO:
aws s3 ls --profile prod-full-s3-access -
Answer the prompt waiting for manual input:
Enter MFA code: _
Create Admin sub-account
IAM Acounts can be created using the Console, but as the number of users grows, that job gets tedius and error prone.
So most enterprises make use of user setup shell scripts to automate the process.
Using a program to automate ensures traceability of changes in coding and data.
Consider the aws-iam-setup.sh from my repo at:
https://github.com/wilsonmar/mac-setup/blob/main/aws-iam-setup.sh
A description of sections in the script (at the top of the script file):
- SET UP SPECIFIC PERMISSIONS
- CREATE MULTIPLE USERS
- SECURITY BEST PRACTICES
- PROGRAMMATIC ACCESS SETUP
- ORGANIZATIONAL SETUP
UTILITY FUNCTIONS
References:
- OReilly Course: “Zero to Hero on AWS Security: An Animated Guide to Security in the Cloud” Apr 2025 by Matt Lea of https://schematical.com
Permissions by Group
REMEMBER: By default, a new IAM user has no permissions to do anything. They are not authorized to even list AWS resources.
CAUTION: To make it convenient for themselves, many “over-provision” AWS with globally powerful permissions.
iam:ListAttachedUserPolicies to
aws iam list-attached-user-policies –user-name $AWS_USER_NAME
iam:ListGroupsForUser to
aws iam list-users –scope LocalOnly –user-name $AWS_USER_NAME
iam:ListUserPolicies to
aws iam list-user-policies –user-name $AWS_USER_NAME
iam:SimulatePrincipalPolicy to
aws iam simulate-principal-policy
–policy-source-arn “arn:aws:iam::$AWS_ACCT_ID:user/$AWS_USER_NAME”
–action-names pricing:GetProducts
servicecatalog:ListApplications ??? Resources: * https://www.youtube.com/c/cloudopian
TODO:
Manual setup steps
-
In the IAM page click “Create individual IAM users”. What it says is important:
“Create IAM users and give them only the permissions they need. Do not use your AWS root account for day-to-day interaction with AWS, because the root account provides unrestricted access to your AWS resources.”
- Click “Manage users”.
- Click “Add User”.
-
PROTIP: For the user name field, define a pattern of up to 64 characters with dashes (instead of spaces and underlines) to separate words.
For the Administrator to do work (of assigning):
root-admin-work
- Click “Programmatic access”.
- If you would like to use AWS Management Console access, leave the default for Autogenerated password because you’ll create a new password at next sign-in.
-
Click “Next: Permissions”.
We’ll add groups later, below.
-
Click “Attach existing policies directly” because the Admin account it is limited.
-
Rather than granting “AdministratorAccess” which gives all access, give policy to what :
- SystemAdministrator
-
IAMFullAccess covers the others:
- IAMReadOnlyAccess
- IAMSelfManageServiceSpecificCriteria
- IAMUserChangePassword
- IAMUserSSHKeys
- Click “Next: Review”.
-
Click “Create user”.
### Secrets Manager GUI
-
If you use an account without and search for the “Secrets Manager” service, red errors appear:
Failed to fetch a list of Amazon Redshift Serverless namespaces. User: arn:aws:iam::123456789012:user/260207a is not authorized to perform: redshift-serverless:ListWorkgroups on resource: arn:aws:redshift-serverless:us-east-1:123456789012:workgroup/* because no identity-based policy allows the redshift-serverless:ListWorkgroups action
To fix that, use my python program to issue permissions with this policy for RedShift serverless data warehouse workgroup on us-east-1:
"Action": [ "redshift-serverless:ListWorkgroups" ], "Resource": [ "arn:aws:redshift-serverless:us-east-1:123456789012:workgroup/*" ] -
Failed to fetch a list of Amazon Redshift clusters. The AWS Access Key Id needs a subscription for the service
-
Failed to fetch a list of Amazon DocumentDB clusters. The AWS Access Key Id needs a subscription for the service.
- Failed to fetch a list of Amazon RDS databases. User: arn:aws:iam::123456789012:user/260207a is not authorized to perform: rds:DescribeDBInstances on resource: arn:aws:rds:us-east-1:123456789012:db:* because no identity-based policy allows the rds:DescribeDBInstances action
"Action": [ "rds:DescribeDBInstances" ], "Resource": [ "arn:aws:rds:us-east-1:123456789012:db:*" ] - Failed to fetch a list of Amazon DocumentDB clusters. User: arn:aws:iam::123456789012:user/260207a is not authorized to perform: rds:DescribeDBClusters on resource: arn:aws:rds:us-east-1:123456789012:cluster:* because no identity-based policy allows the rds:DescribeDBClusters action
"Action": [ "rds:DescribeDBClusters" ], "Resource": [ "arn:aws:rds:us-east-1:123456789012:cluster:*" ] - Access denied to ce:GetCostAndUsage. You don’t have permission to ce:GetCostAndUsage. To request access, copy the following text and send it to your AWS administrator.
Action: ce:GetCostAndUsage
resource(s): arn:aws:ce:us-east-1:432023396193:/GetCostAndUsage
Inform user of credentials
-
To see what is sent if you click “Send email”, right-click on the link and “Copy Link”, then paste in a text editor to see:
subject=Welcome to Amazon Web Services
body=Hello,  You have been given access to the AWS Management Console for the Amazon Web Services account ID ending in 8630. You can get started by using the sign-in information provided below.%0A%0ASign-in URL: https://103265058630.signin.aws.amazon.com/console%0AUser name: root-admin-work
Your initial sign-in password will be provided separately from this email. When you sign in for the first time, you must change your password.
Sincerely, Your AWS Account Administrator
-
PROTIP: Along with the Access Key Id and Secret access key, the default Region and format are also required to perform “aws configure”, so add that information in the email.
PROTIP: Add what AWS Groups and associated Policies the user has been given.
PROTIP: Also include in the email, for those who use AWS CLI, how to install it and 3rd-party tools.
For those who use the AWS Console GUI, explain the mobile apps to install. Provide them the URL with the region included, such as:
https://us-west-2.console.aws.amazon.com/lambda/home?region=us-west-2
NOTE: Baking different zones into Console URLs makes for more direct connections and removes issues from using a single URL/DNS.
Alternately, if IAM Identity Center is being configured:
aws configure ssoFollow the prompts to set up SSO with your organization.
-
Click “Download .csv” to download a “credentials.csv” file to your Downloads folder. It contains columns are a couple columns different than the “Add User” GUI:
User name, Password, Access key ID, Secret access key, Console login link
The “Console login link” is the “Sign-in URL” in the email.
Apply an IAM password policy
-
Click “Manage Password Policy” so AWS will ensure that “strong” passwords are used (and not easy to guess ones).
AWS defaults are terrible:
</a>PROTIP: Over time, as hackers have access to more powerful computers that can guess passwords quicker, larger passwords are necessary to make them more difficult to crack.
-
PROTIP: The largest Minimum password length AWS allows is 128 characters. 1Password can generate up to only 64 characters. Practically, 22 characters is a reasonable minimum. Require at least one number and one non-alphanumeric character.
PROTIP: Each site may have different rules about what special characters are allowed. So generate a smaller string, then manually add special characters. Copy the final string before pasting into the form.
-
Click “Apply password policy”.
Test login using IAM user
 </a>
</a>Unique restricted email for God-Mode Global Admin Root account
 The email provided for “Sign up” is called the “Root” account “for account recovery”.
WARNING: By default, permissions for a “Global Adminstrators” group is granted to the email used to create the root account. The Global Adminstrators group has unlimited access to do anything to all AWS resources under the account and thus unlimited ability to rack up charges (legitimate or otherwise). By resources I mean: users, groups, roles, IAM Access Policies, API keys, etc. globally for all regions.
Auto-Generate Emails with Responders
Global Administrators can reduce time and hassle that both they themselves and their end-users (internal customers) by doing ALL AWS account setup tasks rather than giving a long list of instructions for end-users to follow (as shown below), then providing support to those who won’t or don’t follow instructions. This is especially true for those who are “not technical”. This means automation of email creation and also having automation impersonate each user’s email for verification of AWS account, GitHub, etc.
PROTIP: Use a separate email address for each AWS account you create. Global Administrators working with AWS need to have admin control of an email system to create email accounts and (automatically) read/answer sample user emails.
-
Individual learners need to generate several email accounts to take advantage of “Free Tier” that only lasts a year each. AWS learners need to create their own account to not disturb corporate work.
-
Corporate Global Administrators need to generate emails for each new employees who join.
-
PROTIP: To prevent destructive hacking, a separate account should be created with permissions to delete important data in production. Other standar accounts should not be able to delete production files. The person using this account should have the feduciary responsibility to ensure a full backup is confirmed before performing deletes.
Within an organization, it’s common for a separate account to be created for each department and project as well as each user. This is to limit the blast radius when a user’s credentials become compromised, a situation we need to prepare for.
### Quick Access icons
Save time by quickly get to the most frequently used services by having their icons at the top Favorites menu bar.
- Click the push-pin icon.
-
One by one, drag the icon on the list and drop it on the top black menu to the left of the orange push pin. If you don’t see the black menu, pause just under the browser URL for the browser to automatically scroll.
PROTIP: The services most often used are IAM, VPC, EC2, S3.
-
If you have good memory of what icons mean, change the Settings to “Icons only”.

### Create IAM Users
- Click Users on the left menu.
- Click Add User.
-
Specify User Name. For example: user1@myco.com
PROTIP: Use underscores to separate words in IAM User Names rather than spaces.
- Check “Programmatic Access”.
- Uncheck “User must create a new password at next sign-in”.
- Click “Next: Permissions”.
-
Click “Attach existing policies directly” for the first user.
PROTIP: The policy attached depends on what the user will be allowed to do.
- Send to each user the AccountId, UserName using a different mode of communication than the password.
- User signs in using the credentials Account Id, the UserName, and password
-
Click “Send email”
PROTIP: Send credentials to your alternate email rather than to a cloud drive (Amazon, Google, Box, etc.); an email account that you setup with a fake birthdate and other personal information; one you never give out to anyone.
Installing, updating AWS CLI
AWS CLI versions 1 and 2 use the same aws command name.
If you have both versions installed, your computer uses the…docs.aws.amazon.com
The installer automatically creates a symlink in a folder in your PATH which links to the main program in the installation folder you chose:
- Identify the version and location of what is installed:
ls -al $(which aws)Response:
lrwxr-xr-x 1 johndoe admin 31 Jan 24 02:07 /opt/homebrew/bin/aws -> ../Cellar/awscli/2.33.6/bin/aws
- Upgrade to latest version:
brew upgrade awscliThe above is equivalent to:
curl "https://awscli.amazonaws.com/AWSCLIV2.pkg" -o "AWSCLIV2.pkg" sudo installer -pkg AWSCLIV2.pkg -target / - Verify install:
aws --versionSample response (at time of writing):
aws-cli/2.33.6 Python/3.13.11 Darwin/24.6.0 source/arm64
Previously:
aws-cli/1.20.3 Python/3.7.3 Darwin/18.7.0 botocore/1.21.3
AWS configure
The AWS Management Console provides a way for account owners (administrators) to manually create IAM user accounts for programmatic access.
- To prompt acceptance or override of default AWS ACCESS KEY ID, AWS SECRET ACCESS KEY, and region saved as a plain-text file at~/.aws/credentials</tt>
aws configureThe command causes prompting for Access Key Identifiers (AKIDs) to an AWS account.
AWS Access Key ID [None]:
Press Enter to accept the value previously defined:
[default]
aws_access_key_id = AKIDEFGHIJKLMNOPQRST
aws_secret_access_key = 123456786iJsvzQbkIlDiFtBh6DrPzIw8r7hVb35
- To confirm the default region (such as “us-east-1”):
aws configure get region - Manually use the IAM GUI to disable programmatic access to their root (email) account and protect it with MFA (Multi-factor Authentication)
Secure Individual Config
CAUTION: For individual users, AWS stores the long-running secret credentials file in clear text, unprotected by encryption. Clicking on a roque link on a phishing email would expose that file for theft. Many who lose control of their AWS credentials see bills from Amazon of thousands of dollars in unauthorized use (mining Bitcoins).
For programmatic access to resources running inside AWS, the best practice is to use IAM roles which are not associated with a specific user or group. Any trusted entity can assume the role to perform a specific business task. A resource can be granted access without hardcoding an access key ID and secret access key into the configuration file. For example, you can grant an Amazon Elastic Compute Cloud (EC2) instance access to an Amazon Simple Storage Service (Amazon S3) bucket by attaching a role with a policy that defines this access to the EC2 instance. IAM dynamically manages the credentials for you with temporary credentials it rotates automatically.
Outside AWS (on a Terminal/Console on your laptop), a dedicated service account should be created for each use case with only the permissions needed to limit the “blast radius” if credentials are compromised. For example, if a monitoring tool and a release management tool both require access to your AWS environment, create two separate service accounts with two separate policies that define the minimum set of permissions for each tool.
When Amazon began offering AWS in 2006, it was a safer, kinder world where a file in one’s own laptop can be considered secure. So by default the file $HOME/.aws/credentials remains stored in plain-text, but only for individual (learning) accounts.
OPTION A: AWS organizational logon now use more secure mechanisms.
Progress toward AWS providing a more secure approach is at https://github.com/aws/aws-sdk/issues/41
OPTION B: To adopt a “Zero Trust” strategy, CloudAcademy.com (and many enterprises) create a centrally-administered “Vending Machine” application to generate and dispense new temporary IAM user accounts with access keys when needed. Each eredential are destroyed after being valid for only 12 hours or less. So there is less of a window for theft.
OPTION C: Store credentials in a temporarily open removeable USB stick that’s otherwise encrypted. Instructions for that are described below.
WARNING: This approach requires tedious repeated manual effort.
- Get a USB stick.
- Program the PIN and Admin PIN if it has a PIN pad.
- Make a folder “AWSKEY1” for the first account.
- Copy credential file to the USB stick.
- Edit your laptop’s startup shell script (.zshrc, .bashrc, or .bash_profile) to put in that path, if found, system variables directing the aws command to look into the path on the removeable drive (instead of ~/.aws/credentials).
- Reboot to see it working.
- Run the shell script to back up the folder to your cloud.
- Test restore from backup.
- Move the credentials to Trash and empty it.
Setup Git-signing
-
Install GPG locally using my instructions at:
-
Generate encrypted file “credentials.gpg” from file “credentials”. See:
https://wilsonmar.github.io/git-signing/#bonus-encrypting-whole-files-using-gpg
-
To be able to retrieve secrets in case you lose your laptop, for backup make a copy of the secret file in encrypted format, somewhere else.
-
Make a backup of GPG keys somewhere else (in a key vault) so you can decrypt. One way is to store your private key in a Yubikey USB chip you plug into your laptop.
-
Using the GPG private key, encrypt the aws/credentials file to a new credentials.gpg file also in the same ~/.aws folder.
-
Delete the file at ~/.aws/credentials
-
Download my shell script:
curl "https://raw.githubusercontent.com/wilsonmar/DevSecOps/main/bash/awslogin.sh" -o "awslogin.sh"
NOTE: It works similar to https://github.com/99designs/aws-vault, but with no external dependencies (other than GPG). However, aws-vault supports several vaulting backends.
- Run the script to login based on the encrypted credential.gpg file:
source ~/awslogin.shAlternately, run the script to use the “susan” profile defined:
source ~/awslogin.sh -p susanThe script unencrypts the gpg file, invokes aws login, then removes the unencrypted file.
BONUS: To parse variables from within an AWS credentials file, consider: GitHub - whereisaaron/get-aws-profile-bash: Fetch AWS keys and secrets from ~/.aws/credentials…
This is a pure bash script that can parse and extract AWS credentials (key id and secret) from a ~/.aws/credentials…github.com
- PROTIP: If you use it, remember to clear out variables after usage, so they don’t linger in memory.
TODO: Put each AWS CLI command in a script at https://medium.com/circuitpeople/aws-cli-with-jq-and-bash-9d54e2eabaf1 by Lee Harding
https://aws.amazon.com/cli/
Roles for federated access
An analogy is a private ball where royal guests arrive wearing formal attire present an invitation card to enter. The fancy outfits with sashes and medals are kinda like group permissions that confer permissions to someone. The invitation card is kinda like IAM roles which are only for specific times.
The host of the party is kinda like AWS’s STS (Security Token Service) identify broker which grants access tokens to enable services to “assume” a role to perform on AWS services.
IAM roles are used by computer programs reaching through Enterprise identity federation into Microsoft Active Directory using SAML (Security Assertion Markup Language) or through Web identity federation into Google, Facebook, Amazon, etc.
IAM roles issue keys are valid for short durations, making them a more secure way to grant access.
An IAM user needs to be granted two distinct permissions to launch EC2 instances with roles:
- Permission to launch EC2 instances.
- Permission to associate an IAM role with EC2 instances.
### Admin Sign In
- Sign out and sign in again to the AWS Console using the newly created admin sub-account.
aws-info.sh
-
View the description of my aws-info.sh shell script at:
https://github.com/wilsonmar/mac-setup/blob/main/aws-info.sh
chmod +x aws-info.sh ./aws-info.sh -v -
Display all information about the logged-in account by running the shell script:
chmod +x aws-info.sh
./aws-info.sh -all
AWS Services List
Services for web app
VIDEO: The most important services for a 3-tier multi-node databased web application with search and monitoring:
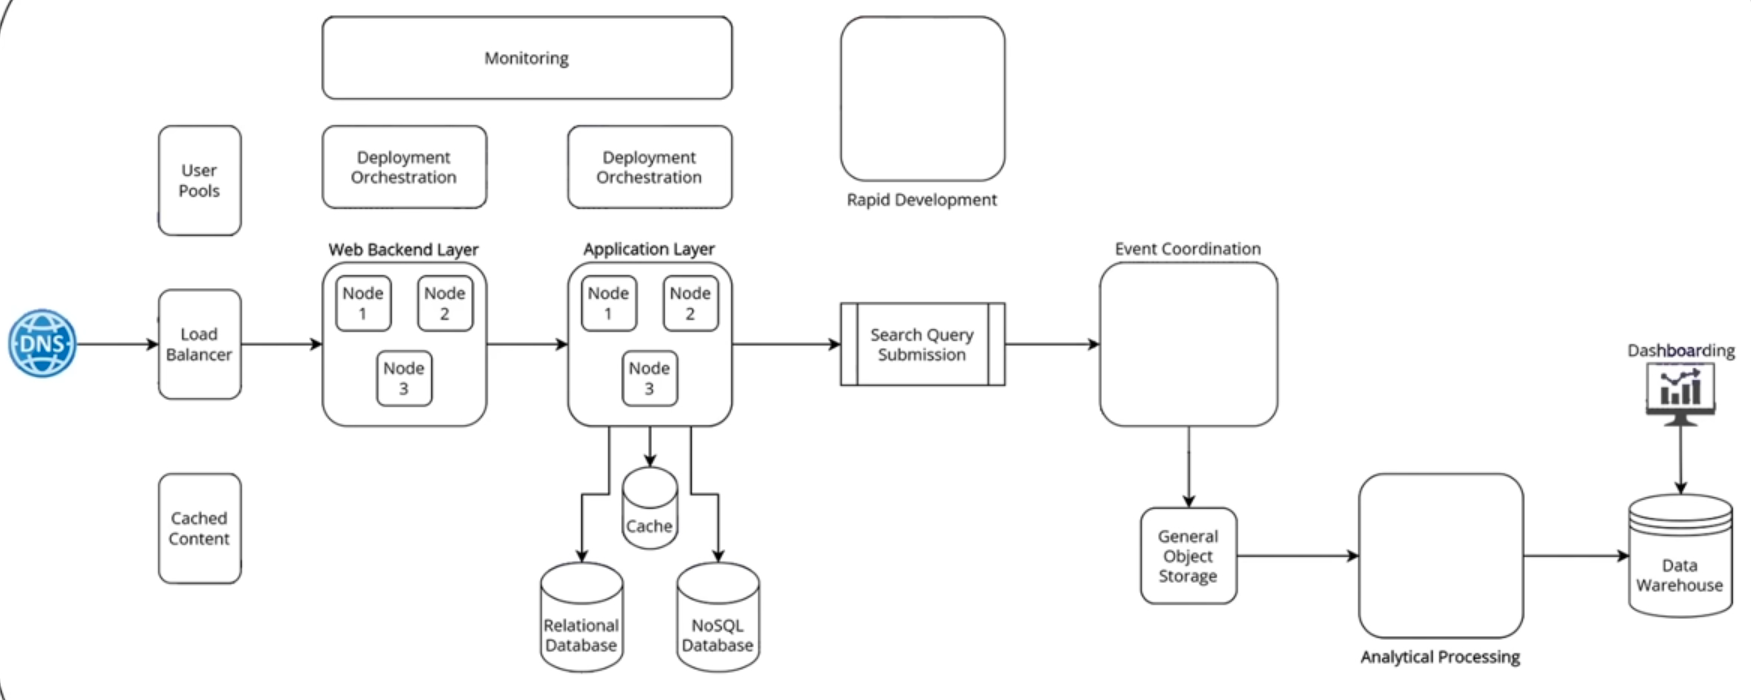
VIDEO: Portfolio project.
AWS services by category
- Use CLI to list all AWS services available:
aws help 2>&1 | grep -A 500 "AVAILABLE SERVICES" | head -100Core Compute & Containers: • ec2, ecs, eks, ecr, lambda, lightsail, batch, elastic-beanstalk Storage: • s3, s3api, s3control, ebs, efs, fsx, glacier, backup, storagegateway Database: • rds, dynamodb, elasticache, redshift, neptune, docdb, timestream-query, timestream-write, memorydb Networking & Content Delivery: • vpc, cloudfront, route53, elb, elbv2, api-gateway, apigw, direct-connect, vpc-lattice Security & Identity: • iam, cognito-identity, cognito-idp, kms, secrets-manager, acm, waf, wafv2, guardduty, inspector, macie Developer Tools: • codecommit, codebuild, codedeploy, codepipeline, codeartifact, cloud9, cloudshell Management & Governance: • cloudformation, cloudwatch, cloudtrail, config, organizations, ssm, systems-manager, opsworks Analytics: • athena, emr, kinesis, quicksight, glue, redshift-data, opensearch Machine Learning: • sagemaker, rekognition, comprehend, translate, transcribe, polly, lex, textract, bedrock Application Integration: • sns, sqs, eventbridge, step-functions, swf, mq, appflow Monitoring & Observability: • cloudwatch, logs, xray, application-insights
- Click the icon with the 9 square dots at upper-left for an alphabetical list of service categories.
- Click “All services” for an alphabetical list of all AWS services. (Previously, there was a thumb tack icon).
-
Click “View all services” in the content for a list of service names by category (in random order).
Notice the URL of the page is for a specific region:
https://us-east-1.console.aws.amazon.com/console/services?region=us-east-1
-
PROTIP: Add the URL to Bookmarks tab named, with region in the name:
Svcs us-east-1
-
PROTIP: DOTHIS: The Chrome browser extension “AWS Services” provides a list of services by name and category so you can click it to get to Console and documentation for each service.
-
PROTIP: DOTHIS: Read the User Guide for each service at:
Icons and Diagrams
- https://www.awsicon.com/icon/q
ProcessOn.com provides a free on-line tool to draw diagrams such as this
At architecture/icons Amazon provides a sample .PPTX (PowerPoint 2010+) file (AWS_Simple_Icons_PPT_v16.2.22.zip). Lines used to illustrate the hierarchy:
PROTIP: Use different colors for lines and text to reduce visual confusion.
You can also download a zip containing .png and .svg files of icons (AWS_Simple_Icons_EPS-SVG_v16.2.22.zip).
Free AWS services
myApplications:
- AppRegistry
- AppManager
- Amazon CloudWatch
- Amazon EC2
- AWS Lambda
- AWS Resource Explorer
- AWS Security Hub CSPM
- Systems Manager
- AWS Service Catalog
- Tagging
Governance:
- AWS Budgets: Improve planning and cost control with flexible budgeting and forecasting
- Amazon Cognito: Simple and Secure User Sign-Up, Sign-In, and Access Control.
- AWS Service Catalog: Create and manage catalogs of IT services that are approved for use on AWS.
Social media:
- AWS re:Post: A community-driven, questions-and-answers service to help AWS customers remove technical roadblocks.
- Amazon Q Business: Unleash the power of generative AI in the workplace with Amazon Q Business
- Amazon Pinpoint: Send and receive messages to and from your customers.
Operational Utilities:
- AWS CloudFormation: Model and provision all your cloud infrastructure resources with code to enable configuration compliance and faster troubleshooting.
- AWS Resource Access Manager: Securely share your resources across AWS accounts or within your organization.
- AWS CloudTrail: Log, continuously monitor, and retain account activity related to actions across your AWS infrastructure.
- Amazon CloudWatch: Monitoring for AWS cloud resources and applications.
- Amazon Managed Service for Prometheus: a Prometheus-compatible service that monitors and provides alerts on containerized applications.
Operational Utilities:
- AWS Resource Explorer: search for and discover your resources across AWS Regions.
- AWS License Manager: Set rules to manage, discover, and report third-party license usage proactively
-
AWS Systems Manager: Centralize operational data from multiple AWS services and automate tasks across your AWS resources.
-
Amazon OpenSearch Service: Managed service that makes it easy to perform interactive log analytics, real-time application monitoring, website search, and more.
- AWS HealthLake: Securely store, transform, transact, and analyze health data in minutes
Security:
- Amazon Route 53: Amazon Route 53 is a highly available and scalable cloud Domain Name System (DNS) web service.
- AWS Control Tower: The easiest way to set up and govern a new, secure multi-account AWS environment.
- AWS Certificate Manager: Provision and manage SSL/TLS certificates for use with AWS, hybrid, and multicloud workloads
- AWS Key Management Service: AWS Key Management Service is a managed service that provides easy encryption with administrative controls.
- AWS WAF Bot Control: Protect your web applications from common and pervasive web bots
- Amazon SWF: Task coordination and state management service for Cloud applications.
Developer Tools:
- Amazon Q Developer: The most capable generative AI–powered assistant for software development
- AWS Application Discovery Service: Collects server specification information, performance data, and details of running processes and network connections.
- AWS Step Functions: Coordinate components of distributed applications.
- AWS Amplify: Serverless, NoSQL, fully managed database with single-digit millisecond performance at any scale.
- Amazon EventBridge: Build event-driven applications at scale across AWS, existing systems, or SaaS applications
-
Amazon CodeCatalyst: Quickly build and deliver apps at scale on AWS
- AWS CodeBuild: Fully managed build service that builds and tests code in the cloud.
- AWS CodeArtifact: Secure, scalable, and cost-effective package management for software development
- AWS CodePipeline: Continuous delivery service for fast and reliable application updates.
- AWS Glue: Simple, flexible, and cost-effective extract, transform, and load (ETL) service.
- AWS X-Ray: Analyze and debug your applications.
Compute:
- Amazon DynamoDB: Serverless, NoSQL, fully managed database with single-digit millisecond performance at any scale.
- Amazon Aurora DSQL: Fastest serverless distributed SQL database for always available applications
- Amazon SQS: Scalable queue for storing messages as they travel between computers.
Data:
- Amazon DataZone: Unlock data across organizational boundaries with built-in governance capabilities
- Amazon S3: Serverless, NoSQL, fully managed database with single-digit millisecond performance at any scale.
- AWS Lambda: Run code without thinking about servers or clusters
- Amazon SimpleDB: Amazon SimpleDB is a highly available NoSQL data store that offloads the work of database administration.
Networking:
- AWS Shield: Protects networks and applications by analyzing network security configurations and providing managed DDoS protection
- AWS API Gateway: Serverless, NoSQL, fully managed database with single-digit millisecond performance at any scale.
- Amazon SNS: Fast, flexible, fully managed push messaging service.
- Amazon CloudFront: Web service to distribute content to end users with low latency and high transfer speeds.
Migration:
- AWS Migration Hub: Migration Hub is a single location to track the progress of application migrations
- Migration Evaluator: Migration Evaluator helps customers rapidly see projected costs of running their on-premises estate in AWS.
- AWS Application Migration Service: Simplify and expedite migrations while reducing cost.
Earn Money: Explore AWS
- Login as a System Administrator.
- Scroll to the “Explore AWS” pane of the AWS Management Console.
- For Filter, select “Earn AWS credits”.
- Click an Activity on the Console, then “Start activity” (to begin earning $20 each).
- Create a web app using AWS Lambda
- Create an Aurora or RDS database
- Launch an instance using EC2
- Set up a cost budget using AWS Budgets
- Use a foundation model in the Amazon Bedrock playground: In this activity, you’ll select a model and submit a prompt to generate a response in the Amazon Bedrock playground.
Setup AWS Budgets
To improve planning and cost control with flexible budgeting and forecasting…
-
In the Console “Explore AWS” widget, click “Set up a cost budget using AWS Budget”.
“Using AWS Budgets, you can set a budget that alerts you when you exceed (or are forecasted to exceed) your budgeted cost or usage amount.
“In this activity, you’ll create a cost budget to monitor your AWS cost and usage.
https://docs.aws.amazon.com/cost-management/latest/userguide/budgets-managing-costs.html
- Click “Start Activity”.
-
In field “Email recipients”,
QUESTION: How to manage changes in email in case of turnover? How to monitor where specific emails are used throughout various budgets.
- Click “Create budget” orange button.
-
Back to “Explore AWS” to see a green “Completed”.
- Upon enablement of AWS Cost Explorer, AWS sends out email “AWS Cost Anomaly Detection”.
- Click “Trust sender” (anomalydetection@costalerts.amazonaws.com).
-
Visit https://us-east-1.console.aws.amazon.com/costmanagement/home#/anomaly-detection/overview?activeTab=history
- PROTIP: In your Calendar, setup an event to put aside monthly time for reviewing AWS bills and reports.
QUESTION: Obtain billing reports.
HashiCorp Terraform
DR;TL AI has grown capable enough now to generate Cloud Formation from natural-language prompts and audits of resources have matured to be trustworthy as well. So use of an intermediate language such as Terraform is no longer necessary.
HashiCorp’s Terraform is a tool for building, changing, and versioning infrastructure safely and efficiently. Terraform can manage existing and popular service providers as well as custom in-house solutions.
VIDEO: To use Terrafrom IaC (Infrastructure as Code) to create a AWS EC2 instances (instead of Chef, Puppet, Ansible, etc.):
CAUTION: The AWS way of keeping credentials in the $HOME/.aws/credentials file is not secure because if your laptop is compromised or stolen, those secrets could be used without authentication. So many organizations request that secret credential files be temporary (valid for just one day). So some make available a corporate “Vending Machine” app which generates credentials instead of the manual process below.
- Click on your email at the upper-right corner to select “Security credentials” for the IAM page.
- Scroll to click “Create Access keys”, “Command Line Interface”.
- Check “I understand”, “Next”.
- Construct a Description tag value that satisfies your organization’s naming conventions.
-
Click “Create access key”.
-
Switch to a Terminal to issue aws configure to specify the Access Key ID and Secret Access Key.
PROTIP: The aws configure command creates a file at $HOME/.aws/credentials with the Access Key ID and Secret Access Key.
- Switch back to the web page.
- Click the copy icon for the Access Key. Switch to your secret file and paste the value into a text file.
- Click the copy icon for the Secret Access key. Switch to your secret file and paste it into the same text file.
- Specify Default region such as us-east-1 - the default.
-
Specify Default output format json.
- Switch to the web page to click “Done”.
-
Identify a GitHub repo you want.
- Switch to the Terminal.
- Create or navigate to a folder for your GitHub account to receive repositories cloned.
-
Get that sample Terraform repo, and cd into it.
git clone https://github.com/wilsonmar/aws-ec2-micro.git --depth 1
cd aws-ec2-micro
PROTIP: Typically, for secure production usage, many resources would be created, including roles to limit access. So using Terraform would be faster, easier, more accurate, and more secure than manual creation clicking and typing on the AWS Console GUI.
-
Edit the files which specify the AWS provider described at https://registry.terraform.io/providers/hashicorp/aws/latest/docs, such as this main.tf
provider "aws" {
  region = "us-east-1"
}
resource "aws_instance" "example" {
  ami           = "ami-0c55b159cbfafe1f0"
  instance_type = "t2.micro"
}
REMEMBER: The ami id is tied to the region and instance_type for which it was created. For that reason, many run a Bash script to get the latest ami or use the Packer utility to create a custom ami. That is safer than referencing “golden” ami images created by another organization to meet compliance standards: APRA, MAS, and NIST4.
PROTIP: We recommend that you run a Bash shell file to select the latest ami and for whatever region was selected for the server instance_type. The script can confirm whether the instance_type specified is available in the region specified. The script would also have coding to set environment variables in a secure way, consistently over time among teammates. This also enables AWS Tags to be specified effortlessly, such as “CreatedBy” with your email address pulled in automatically. See my documentation.
PROTIP: Many specify in the user_data section within the main.tf file Bash scripts containing Ansible commands to run immediately after EC2 instance boot up.
-
A terraform.tfvars file is commonly specified to specify custom values to replace default values in the main.tf file.
PROTIP: The terraform.tfvars file may contain secrets, so its file name is specified in .gitignore to prevent it from being checked into GitHub.
-
The script would collect locally Terraform provider files specified in the main.tf file:
terraform init
-
Create resources:
terraform plan --auto-approve --var-file=../vars/ec2.tfvars
If that works:
terraform apply --auto-approve --var-file=../vars/ec2.tfvars
The –auto-approve option is used to avoid the need to type “yes” to confirm.
PROTIP: A Bash script issuing the above commands would add additional steps such as checking for errors, to ensure that resources with vulnerabilities are not even created.
-
Switch back to the web page to view the resources.
-
Use the resources.
-
Delete the resources previously created by Terraform files in the folder:
terraform destroy --var-file=../vars/ec2.tfvars
- REMEMBER: Delete the credentials file after use.
VIDEO: HashiCorp has a “Sentinal” product component which enforces various fine-grained rules (policy sets) to what can be done by each role. It also estimates monthly cost from cloud usage.
Rules in HashiCorp’s Foundational Policy library is at https://github.com/hashicorp/terraform-foundational-policies-library. Such “Policies as Code” are crafted based on Center for Internet Security (CIS) Benchmarks [pdf] (including Compute, Databases, Kubernetes, Storage, Networks) covering Azure and GCP as well as AWS.
Coding to obtain resources from S3
- VIDEO: In this sample JavaScript code to retrieve a bucket from Amazon S3:
import {s3client, GetObjectCommand} from "@aws-sdk/client-s3"; const s3Client = new S3Client({}); const obj = await s3client.send(new GetObjectCommand({ Bucket: 'example-bucket', Key: 'path/to/obj' }); ... -
The new S3Client() is called to find the credentials. App developers don’t have to code authentication code.
- This CLI Bash script code does the same:
aws sso login aws s3api list-objects-v2 --bucket example-bucket \ --prefix path/ --query 'Contents[].{Key:Key}' --output text aws s3api get-object --bucket example-bucket --key path/to/obj --debug /tmp/obj.out - BTW the example-bucket can be retrieved using CLI command:
dig example-bucket.s3.amazonaws.com - To retrieve resources across an AWS account boundary, define a resource-based policy that references the other principal:
{
   "Effect": "Allow",
   "Principal": {
      "AWS": "111"
   },
   "Action": "s3:GetObject",
   "Resource": "arn:aws:s3:::example-bucket/*"
}
Claim S3 Bucket names
The AWS Account Administrator has a fudiciary responsibility to secure Intellectual Property (IP) assets.
S3 Bucket names are universally unique among all AWS customers. So just as there are domain name squatters who register and sit on .com host names for sale at high prices to those who actually use the names, the administrator of root accounts for an organization should register your organization’s brand names before others get them first.
To create a bucket for each host name registered on GoDaddy, Google Domains, etc.
- Click S3 from among services.
- Click the blue “Create bucket” button.
- Type in the host name (such as “wilsonmar.com”) in the Bucket name field.
-
Select your home Region.
PROTIP: Claiming a Bucket name in one region locks it up for all Regions.
- Click “Next”.
- Click “Next”.
- Click “Next” to manage users.
- Click “Create Bucket”.
Automatic key rotation
https://docs.aws.amazon.com/IAM/latest/UserGuide/id_credentials_temp_use-resources.html describes automatic rotatation of AKID credentials (with a quick MFA challenge answered on a mobile phone)

The auto-rotation of AWS IAM User Access Keys diagrammed above is from these guideline from Feb. 2019 uses MIT-licensed CloudFormation templates and Python scripts defined in https://github.com/aws-samples/aws-iam-access-key-auto-rotation and described step-by-step in this Word-format Document.
Setup S3 buckets in the US East (N. Virginia) Region (us-east-1). It runs every 90 days. At 100 days it disables and at 110 days it deletes the old Access Keys. It sets up a secret inside AWS Secrets Manager to store the new Access Keys, with a resource policy that permits only the AWS IAM User access to them.
Another automation sets up an Amazon DynamoDB table to house the email addresses of accounts rotated. These emails are used by a SNS Topic to send alerts when rotation occurs.
Alternately, you can refactor to send a Slack message instead of email (not shown in the diagram).
aws sts assume-role --role-arn arn:aws:iam::123456789012:role/role-name \
   --role-session-name "RoleSession1" \
   --profile IAM-user-name > assume-role-output.txt
https://aws.amazon.com/blogs/security/how-to-rotate-access-keys-for-iam-users/
$ aws iam list-access-keys { “AccessKeyMetadata”: [ { “AccessKeyId”: “AKIAI2YGLLOSZDQ3L5Z1”, “Status”: “Active”, “CreateDate”: “2020-06-12T04:04:22+00:00” } ] }
AWS IAM commands use unique access key identifiers (AKIDs) to refer to individual access keys.
aws iam create-access-key --user-name Alice
Identity and Access Management (IAM) roles for Amazon EC2.
https://docs.aws.amazon.com/general/latest/gr/aws-sec-cred-types.html https://docs.aws.amazon.com/general/latest/gr/aws-sec-cred-types.html#access-keys-and-secret-access-keys
https://docs.aws.amazon.com/general/latest/gr/aws-access-keys-best-practices.html
- Grant temporary access keys - aws sts assume-role.
https://docs.aws.amazon.com/secretsmanager/latest/userguide/rotating-secrets-one-user-multiple-passwords.html
Additionally, add conditions to the policy that further restrict access, such as the source IP address range of clients. The example policy below grants the needed permissions (PutObject) on to a specific resource (an S3 bucket named “examplebucket”) while adding further conditions (the client must come from IP range 203.0.113.0/24):
{
    "Version": "2012-10-17",
    "Id": "S3PolicyRestrictPut",
    "Statement": [
            {
            "Sid": "IPAllow",
            "Effect": "Allow",
            "Principal": "*",
            "Action": "s3:PutObject",
            "Resource": "arn:aws:s3:::examplebucket/*",
            "Condition": {
                "IpAddress": {"aws:SourceIp": "203.0.113.0/24"}
            }
        }
    ]
}
AWS CLI
VIDEO: How to Configure the AWS CLI | Amazon Web Services | AWS Nov 26, 2017 by deeplizard
https://docs.aws.amazon.com/cli/latest/index.html AWS CLI Command Reference
-
To verify the identity being used in AWS CLI:
aws sts get-caller-identity
A sample response:
 "Account": "103265058630",
 "UserId": "AIDAJHXCZNAH2MEXAMPLE",
 "Arn": "arn:aws:iam::103265058630:user/root-admin-work"
Alternately, use an alias defined:
aws whoami
https://www.perplexity.ai/search/how-to-read-aws-config-file-fr-8KyTy2eGRRWq1LnV5TpexQ After awas config Instead of reading from ~/.aws/configure Define in ~/.zshrc or ~/.bashrc or ~/.bash_profile
#USB_PATH=”/Volumes/AWSKEY1” USB_PATH=“~/projects/aws” if [ -d “$USB_PATH” ]; then export AWS_SHARED_CREDENTIALS_FILE=”$USB_PATH/credentials” export AWS_CONFIG_FILE=”$USB_PATH/config” fi
IAM CLI
AWS Identity and Access Management (IAM) controls access to users, groups, roles, and policies.
- List users:
aws iam list-users --query Users[*].UserName - List groups which the user belongs to :
aws iam list-groups-for-user \-\-username ??? - Create a new user named “MyUser”:
aws iam create-user --user-name MyUserThe response:
{ "User": { "UserName": "MyUser", "Path": "/", "CreateDate": "2012-12-20T03:13:02.581Z", "UserId": "AKIAIOSFODNN7EXAMPLE", "Arn": "arn:aws:iam::123456789012:user/MyUser" } } - Add the user to the group:
aws iam add-user-to-group --user-name MyUser --group-name MyIamGroup - To verify that the MyIamGroup group contains the MyUser, use the get-group command:
aws iam get-group --group-name MyIamGroupThe response:
 {
     "Group": {
         "GroupName": "MyIamGroup",
         "CreateDate": "2012-12-20T03:03:52Z",
         "GroupId": "AKIAI44QH8DHBEXAMPLE",
         "Arn": "arn:aws:iam::123456789012:group/MyIamGroup",
         "Path": "/"
     },
     "Users": [
         {
             "UserName": "MyUser",
             "Path": "/",
             "CreateDate": "2012-12-20T03:13:02Z",
             "UserId": "AKIAIOSFODNN7EXAMPLE",
             "Arn": "arn:aws:iam::123456789012:user/MyUser"
         }
     ],
     "IsTruncated": "false"
 }
Linux AMIs
Types of operating system AMI:
- Amazon Linux 2014.09.2 (CentOS)
- Red Hat Enterprise Linux 6.6 (RHEL)
- SUSE Linux Enterprise Server 12
- Ubuntu Server 14.04
Advanced User Data
https://gist.github.com/mikepfeiffer/
-
aws Get-AWSCredentials -ListProfiles
References
This is adapted from what is in Amazon’s Getting Started tutorials.
After signing up for https://www.aws.training, Authentication and Authorization with AWS Identity and Access Management 15 minutes
Tutorial Rock Stars and their presentations
Jeff Barr (@jeffbarr), AWS Chief Evangelist makes announcements of all new stuff at the company’s AWS Blog and #AWS Twitter hash-tag
Yan Kurniawan
-
Ansible for AWS book 280 pages for minimum $30 published on 2016-01-15 by Yan Kurniawan living in Sydney, Australia #ansible4aws.
J O’connner:
- http://joconner.com/
Ryan Scott Brown @ryan_sb
- https://serverlesscode.com/post/new-ssl-tls-cert-manager-acm/
Matt Wood, @mza, Product Strategy @ Amazon Web Services
Matt Lea of schematical.com, cloudwargames.com
- video course “Zero to Hero on AWS Security: An Animated Guide to Security in the Cloud” Apr 2025 referencing https://github.com/wilsonmar/sc-terraform/tree/main/_course
BaSA (Be a Solutions Architect)
There are many ways to learn AWS. The key to learning fully AND quickly – to get a job – is to have an experienced mentors in both technical and behavioral skills, plus real-world projects.
Look at the schedule for the FREE AWS
BaSA (Be a Solutions Architect) program
where AWS employees (Amazonians) around the world hold 2-hour live sessions over 12-weeks
(8 technical and 4 behavioural)
on 𝗦𝗮𝘁𝘂𝗿𝗱𝗮𝘆 𝟴 𝗔𝗠 𝗚𝗠𝗧 / 𝟵 𝗔𝗠 𝗨𝗞 / 𝟭.𝟯𝟬 𝗣𝗠 𝗜𝗦𝗧 / 𝟰.𝟬𝟬 𝗔𝗠 𝗘𝗧).
Videos of each batch are
stored on YouTube
coordinated using email 𝗯𝗲𝘀𝗮𝗽𝗿𝗼𝗴𝗿𝗮𝗺𝟮𝟬𝟮𝟮@𝗴𝗺𝗮𝗶𝗹.𝗰𝗼𝗺 and
LinkedIn group,
which at time of writing has 7,621 members.
Hands-on activities:
Networking:
- Introduction to Cloud The binary choice - OSI Model & IP Addressing
- Amazon S3 It’s all connected - Amazon VPC
- Amazon EC2 Hold the door - NACL & Security Group
- AWS IAM Cloud and beyond - VPN and Direct Connect
- Amazon RDS Peer to Peer - VPC Peering & Transit Gateway
- Amazon DynamoDB What’s in a name? - Route 53 & DNS Resolver
- Amazon Cloudwatch The tool box - Flow Logs & Reachability Analyer
SWF (Simple Workflow Functions) sequences manual work.
AppStream streams desktop apps (like Citrix).
Elastic Transcoder of videos into various sizes and formats (ogg, mp4, etc.)
Orion Papers on Lucidchart
https://scriptcrunch.com/aws-certification-iam-essentials-cheat-sheet/
Define groups to assign permissions
PROTIP: For a user to do something usually require several AWS resources. So several permissions need to be granted to a user. To simplify assignments, we define Groups of permissions which we then can assign to each user.
In other words, An IAM group is a management convenience to manage the same set of permissions for a set of IAM users.
The AWS CLI command to create a group named “MyIamGroup” is:
aws iam create-group --group-name MyIamGroup
A sample response:
{
    "Group": {
        "GroupName": "MyIamGroup",
        "CreateDate": "2012-12-20T03:03:52.834Z",
        "GroupId": "AKIAI44QH8DHBEXAMPLE",
        "Arn": "arn:aws:iam::123456789012:group/MyIamGroup",
        "Path": "/"
    }
}
The AWS CLI command to create a S3 security group:
aws ec2 create-security-group --group-name my-sg --description "My security group"
A sample response:
{
   "GroupId": "sg-903004f8"
   }
-
Click Manage Groups then Create New Group.
PROTIP: Groups are usually associated with a particular job: admin, sales, HR, front-end developer, back-end developer, etc.
A user can belong to multiple groups. More complex organizations manage differences in permissions for company, division, project, location, job level, etc. So 128 characters may not be enough if large words are used. Thus, abbreviate and use acronyms.
PROTIP: Put abbreviations and acronyms in a wiki publicly available to avoid duplicate usage.
-
“aws_iot_buttons” is the group name I use as an example.
PROTIP: Use dashes. Space characters are not allowed. On March 1, 2018 AWS removed the ability to use underscores in S3 bucket names.
The list shown are “AWS Managed”.
-
Click on Policy Type to select Job function.
-
PROTIP: Instead of scrolling down the massive list in Attache Policy (Alexa, Amazon, AWS, etc.), type in the Filter field the first few letters (such as “IoT”) and the list gets smaller. Notice the filter you type is applicable to not just characters beginning with what you typed, but also characters inside names as well.
- Click to select.
-
Click “Create Group”.
Note different policies have different levels of access, with admin having more capabilities than “read only” ones.
- Names shown on the screen is called a “Policy Summary”.
-
Click “JSON” to see the file that AWS reads to assign policies. Here you seen what Actions the policy allows.
-
Click “Access Advisor” to see users who have been assigned to use the policy.
https://docs.aws.amazon.com/iot/latest/developerguide/create-iot-policy.html
Manually Rotate Access keys
See that "AWS recommends that you rotate your access keys every 90 days"?
Some find it easier to remember by doing it on the first day of each month.
Why? There are thousands of big computers around the world literally staying up at night trying different combinations.
-
PROTIP: Make an appointment on your Calendar with a recurring schedule.
PROTIP: Rotation applies to access key of IAM child accounts, not the root account.
You don’t want programmatic access to your root account, so you don’t need no stinkin’ keys.
-
Click Delete to the key. Write down the date Created.
Don’t create a new Access Key.
Use groups to assign permissions
PROTIP: For a user to do something usually require several AWS resources. So several permissions need to be granted to a user. To simplify assignments, we define Groups of permissions which we then can assign to each user.
In other words, An IAM group is a management convenience to manage the same set of permissions for a set of IAM users.
-
Click Manage Groups then Create New Group.
PROTIP: Groups are usually associated with a particular job: admin, sales, HR, front-end developer, back-end developer, etc.
A user can belong to multiple groups. More complex organizations manage differences in permissions for company, division, project, location, job level, etc. So 128 characters may not be enough if large words are used. Thus, abbreviate and use acronyms.
PROTIP: Put abbreviations and acronyms in a wiki publicly available to avoid duplicate usage.
-
“aws_iot_buttons” is the group name I use as an example.
PROTIP: Use underlines or dashes. Space characters are not allowed.
The list shown are “AWS Managed”.
-
Click on Policy Type to select Job function.
-
PROTIP: Instead of scrolling down the massive list in Attache Policy (Alexa, Amazon, AWS, etc.), type in the Filter field the first few letters (such as “IoT”) and the list gets smaller. Notice the filter you type is applicable to not just characters beginning with what you typed, but also characters inside names as well.
- Click to select.
-
Click “Create Group”.
Note different policies have different levels of access, with admin having more capabilities than “read only” ones.
- Names shown on the screen is called a “Policy Summary”.
-
Click “JSON” to see the file that AWS reads to assign policies. Here you seen what Actions the policy allows.
-
Click “Access Advisor” to see users who have been assigned to use the policy.
https://docs.aws.amazon.com/iot/latest/developerguide/create-iot-policy.html
STS returns:
- A Security Token
- An Access Key ID
- A Secret Access Key
More security
- egress rules on your Security Groups (after all there’s no reason ever that your database should be connecting to IP addresses in Russia),
- vulnerability scanning,
- Host-Based Intrusion Detection (HIDS) systems
Secure AWS Credentials
When AWS was first created in 2008, it was a less hostile world. But the default continues to place AWS credentials (account and password) of stand-alone individual accounts in a plain text in file ~/.aws/credentials such as:
[personal]
aws_access_key_id = AKIA...
aws_secret_access_key = ...
aws_session_token = ...   # optional if using temporary creds
Knowing this, that’s the first place hackers go when they are able to get control of a developer’s laptop (though successful phishing attempts).
More enterprise-worthy tech add techniques to encrypt credential away in a cloud are used by AWS IAM Identity Center.
What can individual AWS users do to protect their CLI login credentials?
- https://docs.aws.amazon.com/sdk-for-net/v3/developer-guide/creds-file.html
- https://docs.aws.amazon.com/sdkref/latest/guide/access-temp-idc.html
- Create the AWS credentials file in folder “aws-creds” within a removeable volume on a USB drive:
- Linux/macOS: /media/usb/aws-creds or /Volumes/AWSKEY1/aws-creds
- Windows: E:\aws-creds
- Define OS-level system variables to notify AWS CLI commands and SDKs where the “shared credentials file” is located:
On Linux/macOS:
export AWS_SHARED_CREDENTIALS_FILE=/media/usb/aws-creds/credentials
export AWS_PROFILE=personal
On Windows (PowerShell example):
$Env:AWS_SHARED_CREDENTIALS_FILE = "E:\aws-creds\credentials"
$Env:AWS_PROFILE = "personal"
So I wrote both a CLI and Python program to a) install the mechanisms and b) retrieve credentials from the macOS vault guarded by Apple biometrics. c) backup the credentials in case I lose the enrypted volume.
Another set retrieves from a PIN-lockable removeable drive I temporarily unencrypted.
The challege is to create a
Use my shell script to log into AWS by decrypting credentials stored securely (instead of in plain text).
One reason to encrypt credentials is because it’s wise to have a backup copy of the secret file, in an encrypted format, somewhere else. This enables you to retrieve secrets in case you lose your laptop.
This article covers use of AWS (Amazon Web Services) on MacOS. In the future I’ll be updating this article to cover use of Windows and other secret-handling utilities (Microsoft Azure, Google Cloud Platform, HashiCorp Vault, Akeyless, etc.).
After obtaining an AWS Access Key ID, AWS Secret Access Key for your account (described above), use the credentials on your local machine (laptop), install the AWS CLI locally. Although there is a “awscli” Homebrew formula, but it has been deprecated. So follow this doc to manually install a pkg file for awscli2:
More on Amazon
This is one of a series on Amazon:
- AWS Cloud Services Comparisons
- AWS Well-Architected Cloud
- AWS Cloud Services
- AWS IAM
- AWS CLI
- AWS On-boarding (GUI, CLI, API)
- AWS Security
- AWS Data Tools
- AWS DevOps (CodeCommit, CodePipeline, CodeDeploy)
- AWS server deployment options
- AWS CDK
- Build load-balanced servers in AWS EC2
- AWS Networking
- AWS Xray
- IoT on AWS
- AWS Lambda
- AWS Lambda
More on DevOps
This is one of a series on DevOps:
- DevOps_2.0
- ci-cd (Continuous Integration and Continuous Delivery)
- User Stories for DevOps
- Git and GitHub vs File Archival
- Git Commands and Statuses
- Git Commit, Tag, Push
- Git Utilities
- Data Security GitHub
- GitHub API
- Choices for DevOps Technologies
- Pulumi Infrastructure as Code (IaC)
- Java DevOps Workflow
- AWS DevOps (CodeCommit, CodePipeline, CodeDeploy)
- AWS server deployment options
- Cloud services comparisons (across vendors)
- Cloud regions (across vendors)
- Azure Cloud Onramp (Subscriptions, Portal GUI, CLI)
- Azure Certifications
- Azure Cloud Powershell
- Bash Windows using Microsoft’s WSL (Windows Subsystem for Linux)
- Azure Networking
- Azure Storage
- Azure Compute
- Digital Ocean
- Packer automation to build Vagrant images
- Terraform multi-cloud provisioning automation
-
Hashicorp Vault and Consul to generate and hold secrets
- Powershell Ecosystem
- Powershell on MacOS
- Jenkins Server Setup
- Jenkins Plug-ins
- Jenkins Freestyle jobs
- Docker (Glossary, Ecosystem, Certification)
- Make Makefile for Docker
- Docker Setup and run Bash shell script
- Bash coding
- Docker Setup
- Dockerize apps
- Ansible
- Kubernetes Operators
- Threat Modeling
- API Management Microsoft
- Scenarios for load
- Chaos Engineering
More on Security
https://www.youtube.com/watch?v=t5pCWBp-EjI Mastering the AWS CLI for Cloud Security Engineers
This is one of a series on Security in DevSecOps:
- Security actions for teamwork and SLSA
- Code Signing on macOS
- Git Signing
- GitHub Data Security
- Azure Security-focus Cloud Onramp
- AWS Onboarding
- AWS Security (certification exam)
- AWS IAM (Identity and Access Management)
- SIEM (Security Information and Event Management)
- Intrusion Detection Systems (Goolge/Palo Alto)
- SOC2
- FedRAMP
-
CAIQ (Consensus Assessment Initiative Questionnaire) by cloud vendors
- AKeyless cloud vault
- Hashicorp Vault
- Hashicorp Terraform
- SonarQube
- WebGoat known insecure PHP app and vulnerability scanners
- Security certifications
- Quantum Supremecy can break encryption in minutes
- Pen Testing
- Threat Modeling
- WebGoat (deliberately insecure Java app)
https://www.mssqltips.com/sqlservertip/5997/create-sql-server-notebooks-in-azure-data-studio/
Automation
- Obtain a DNS domain name for experimentation, using AWS Route53.
- Automate generation of new email accounts (with hostname as a variable) using AWS SES (Simple Email Service).
- Emulate user action for AWS account verification within AWS SES.
GenAI
To help you prepare solid for AWS Certified Generative AI Developer Professional Certification
https://builder.aws.com/content/37WkIA5gZe7W23kR29TbLGyn6SF/kiro-cli-as-teacher-for-aws-certified-generative-ai-developer-pro-certification
https://github.com/anandxmj/anix-the-genai-certification-teacher helps you with writing local agents and local knowledge bases. It can be integrated with MCP to extend its capabilities.
https://awslabs.github.io/mcp/
MCP
https://awslabs.github.io/mcp/
https://www.awscloudinstitute.com/ for needs-based grants for the $210/month per course over 27 courses https://aws.amazon.com/training/aws-cloud-institute/resource-hub/
AWSAmplify
glue
https://www.youtube.com/watch?v=g4qKydnd0vU&list=PLmexTtcbIn_hvPcUm3oAufCtH7dwNAC-g
https://www.youtube.com/watch?v=7-7ugqAxgxI
Lambda Function for $20
- Choose “Use a blueprint”
- Choose the blueprint
- Name your function (“http-function-url-tutorial”)
- Acknowledge public Function URL statement
-
Complete function creation
import * as fs from 'node:fs'; const html = fs.readFileSync('index.html', { encoding: 'utf8' }); /** * Returns an HTML page containing an interactive Web-based tutorial. * Visit the function URL to see it and learn how to build with lambda. */ export const handler = async () => { const response = { statusCode: 200, headers: { 'Content-Type': 'text/html', }, body: html, }; return response; }; - Invoke the function
- Review the function code
- Invoke your Function URL
- List resources created.
- Remove the resources created above.
References
Actions and conditions for every AWS service: for AWS S3
BLOG: Building a data perimeter
26-02-18 v111 svcs :aws-onboarding.md created 2016-03-29